After getting my amateur radio license without having to pass a CW test, I felt a little bit cheated, so I vowed that I would learn CW and do my best to help keep it alive. After all, that is one of the two things that I remember about ham radio from my childhood (beeping and antennas). In the past year and a half, I am sorry to say that I have not yet mastered CW. But I have learned a lot about learning CW. 🙂 Baby steps, right?
Because one reason I decided to get into amateur radio was to give myself an outlet for my tinkering needs, I felt it was only fair that I should devote some of this tinker time to learning CW. How do you do that? By making a touch-sensitive paddle with an iambic keyer. This is what I set out to do about six months ago and am proud to say that I have a working finished product to share today. Much of my inspiration was from the fine folks at CW Touch Keyer. Their products were very alluring and I almost bought one of them instead of building it myself, but they didn’t meet all my requirements. (Their Master Keyer was not available yet, which I think does meet all my requirements except the actual paddle part, which you must supply yourself.)
My design goals:
- Touch sensitive paddles
- Act as an USB HID keyboard
- Small
- Variable, persistent settings
- WPM 5-100
- Variable sidetone frequency 100-1000 Hz
- Various keyer modes (iambic a/b, ultimatic, bug, etc.)
- Memories (with auto repeat)
I am happy to report that I have met these goals and more with the N7OH CW-KBD. For the low, low price of $150 you can buy the parts to build your own. I think if I had plans to make this a commercial venture, I would have to cut down on my costs. First to go would likely be the Teensy because if I swapped that out for a Microchip PIC, I could also get rid of the two capacitive touch sensors. Putting that all on a single chip with a small single board, I could certainly reduce the price some. But that is a story for another day.
I started acquiring parts for the keyboard back in the April/May time frame. I started with the basics: I needed the Teensy so I could start tinkering and get back into the AVR embedded programming mode; I needed the capacitive touch sensors so I could get a board designed and start working with them (they only came in tiny surface mount packages so I had to create a breakout board for them); I also ordered some of the other stuff I would eventually need to save on shipping later. Then I excitedly jumped into Eagle and created my breakout board. I actually created a couple of designs. Since ordering with BatchPCB has a base cost plus a per-square-inch cost, I decided that ordering a couple of different designs would not be an issue. And it turns out they sent my twice as many as I ordered (probably because the designs were so small and they had extra room that wouldn’t fit anything else.) That was a really fun process though; I have never designed a PCB before.
I don’t know how many hours I spent reading through the 408-page ATMega32U4 manual. I pulled out some old AVR code I had written in college and tried to make it work. I spent about as much time refactoring the old code as I would have spent writing new stuff. Finally I had some basic hardware support for timers, PWMs, and USB (with the help of LUFA.) From there, I moved back to the non-embedded space to try out the main portion of CW encoding and decoding. First I whipped up a program that would write out the proper timing for dits and dahs if given a string of text to type. It didn’t take very long for that, but it was much faster to have printf and instant feedback without reprogramming a device. I ported this code back to the Teensy (with minimal changes, thanks to my portable coding techniques) and was able to get a simple program up and running that would blink “hello world.” at me once a minute. I moved back to userspace and figured out how to use raw events to emulate interrupts and user timers instead of hardware timers. I extended my program to with a state machine that would read in dit and dah paddle presses and encode them into a stream of CW that can be decoded into ASCII and pushed up to the HID layer. My original state machine was too complex and introduced timing errors into the encoding, so I ditched it for this simpler version.
It took me a while to hunt down all the itty-bitty timing issues. Sometimes there were weird little hiccups in the output that I couldn’t explain. I did finally hunt them down and get smooth operation though. Then I went and filled out the big wish list of coding features (memories, keying modes and speeds, etc.) This took some time but was quite fun. I also found and fixed a few more bugs that I uncovered while I was at it. After I had the list all checked off, I still didn’t have the nerve to permanently affix all the parts. Up until now, they were all connected on a solder-less breadboard. I decided to get crazy and reduce the power consumption. It’s not like it was a pig or anything; it was already using a low-power sleep mode and was completely interrupt driven. I knew that I could reduce the 40mA power requirement with a bit of skillful coding. While it did not have any busy loops, there were a lot of wake-ups that were not needed. For example, part of the architecture is a 1ms timer that allows things to run with a 1ms accuracy. But what if nothing needs to run? It would still fire. I managed to have the things that didn’t need to run inform the timer and then have the timer shut down if there were no users. This meant than if the paddles were not pressed, it would go into a deep sleep state (<10mA) and then would wake up as soon as a paddle was pressed.
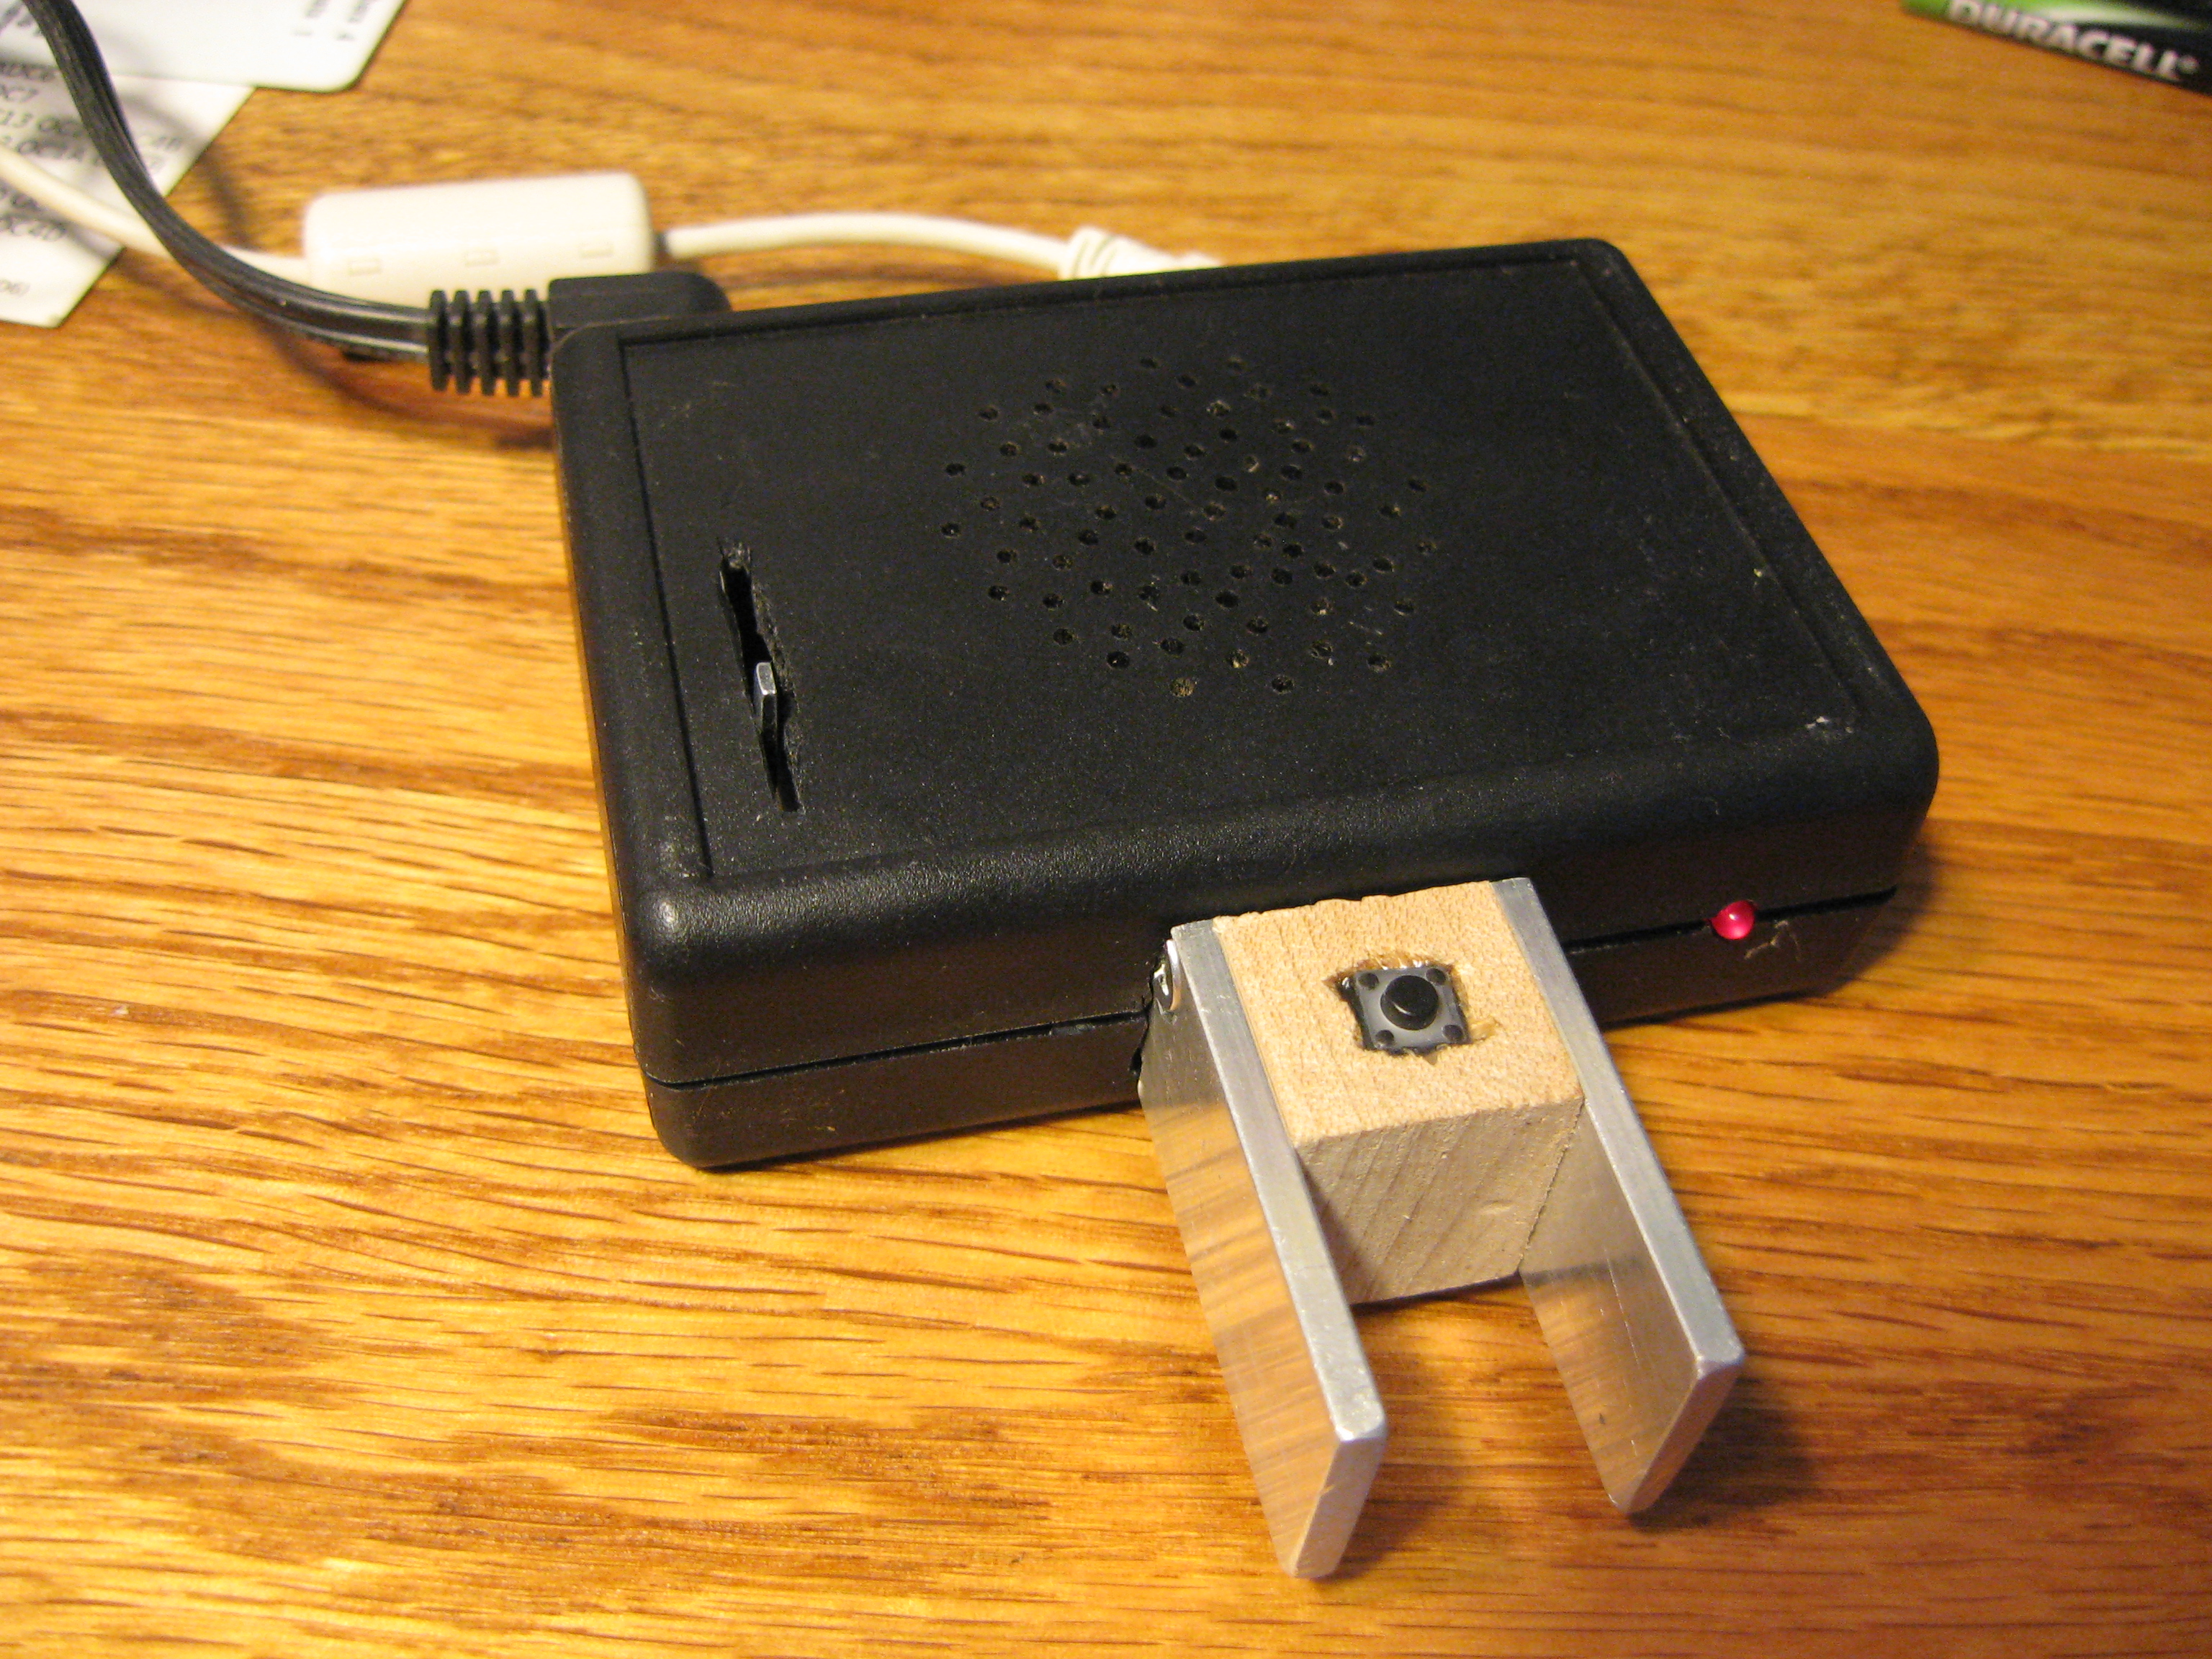
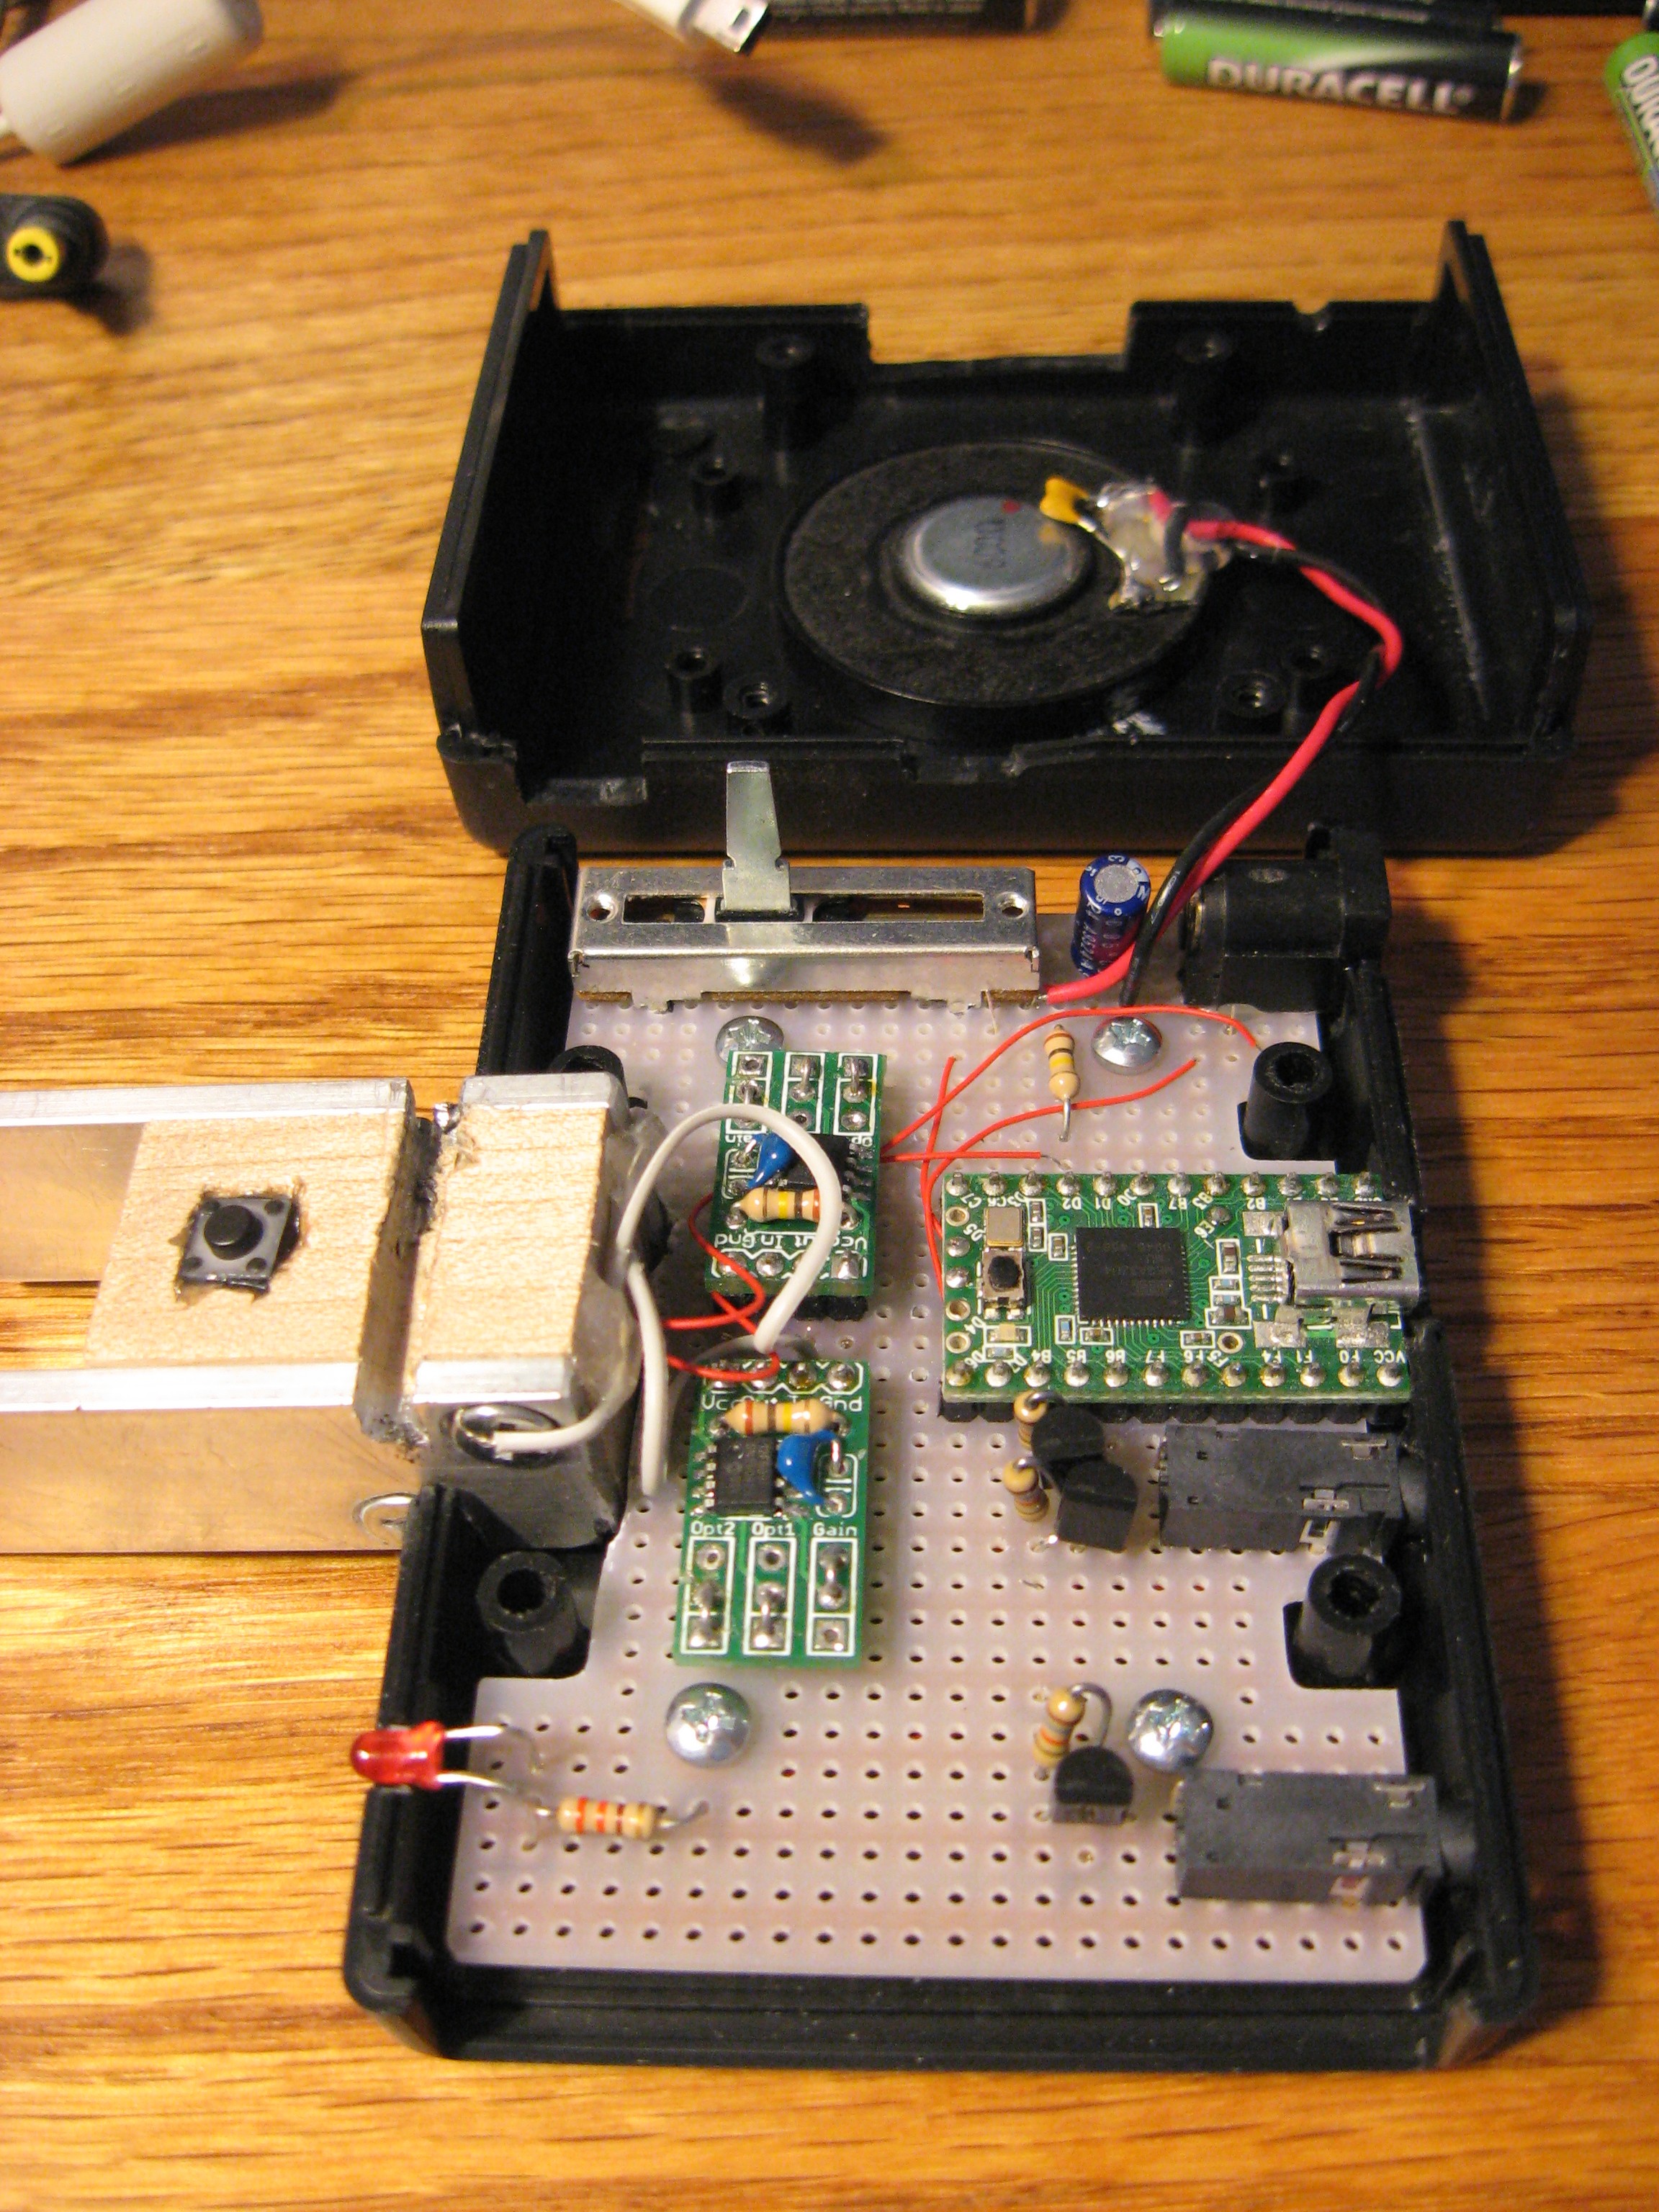
Finally, I got brave and soldered all my parts together on a prototyping board and put it in a little plastic case. I drilled holes in all the right places to allow for the connectors (power, USB mini-B, key out, paddle out, an LED, a reset button, the speaker, the volume control, and the paddles). I skillfully mounted the two aluminum paddles on a small block of wood and then cut a groove in them to make them have a solid mechanical connection to the box. I am pretty proud of the box. After I had it all assembled, I realized it was too light weight and would move around whenever I touched the paddles. I fixed this by adding some screws to the bottom so I could screw it to a plate of lexan.
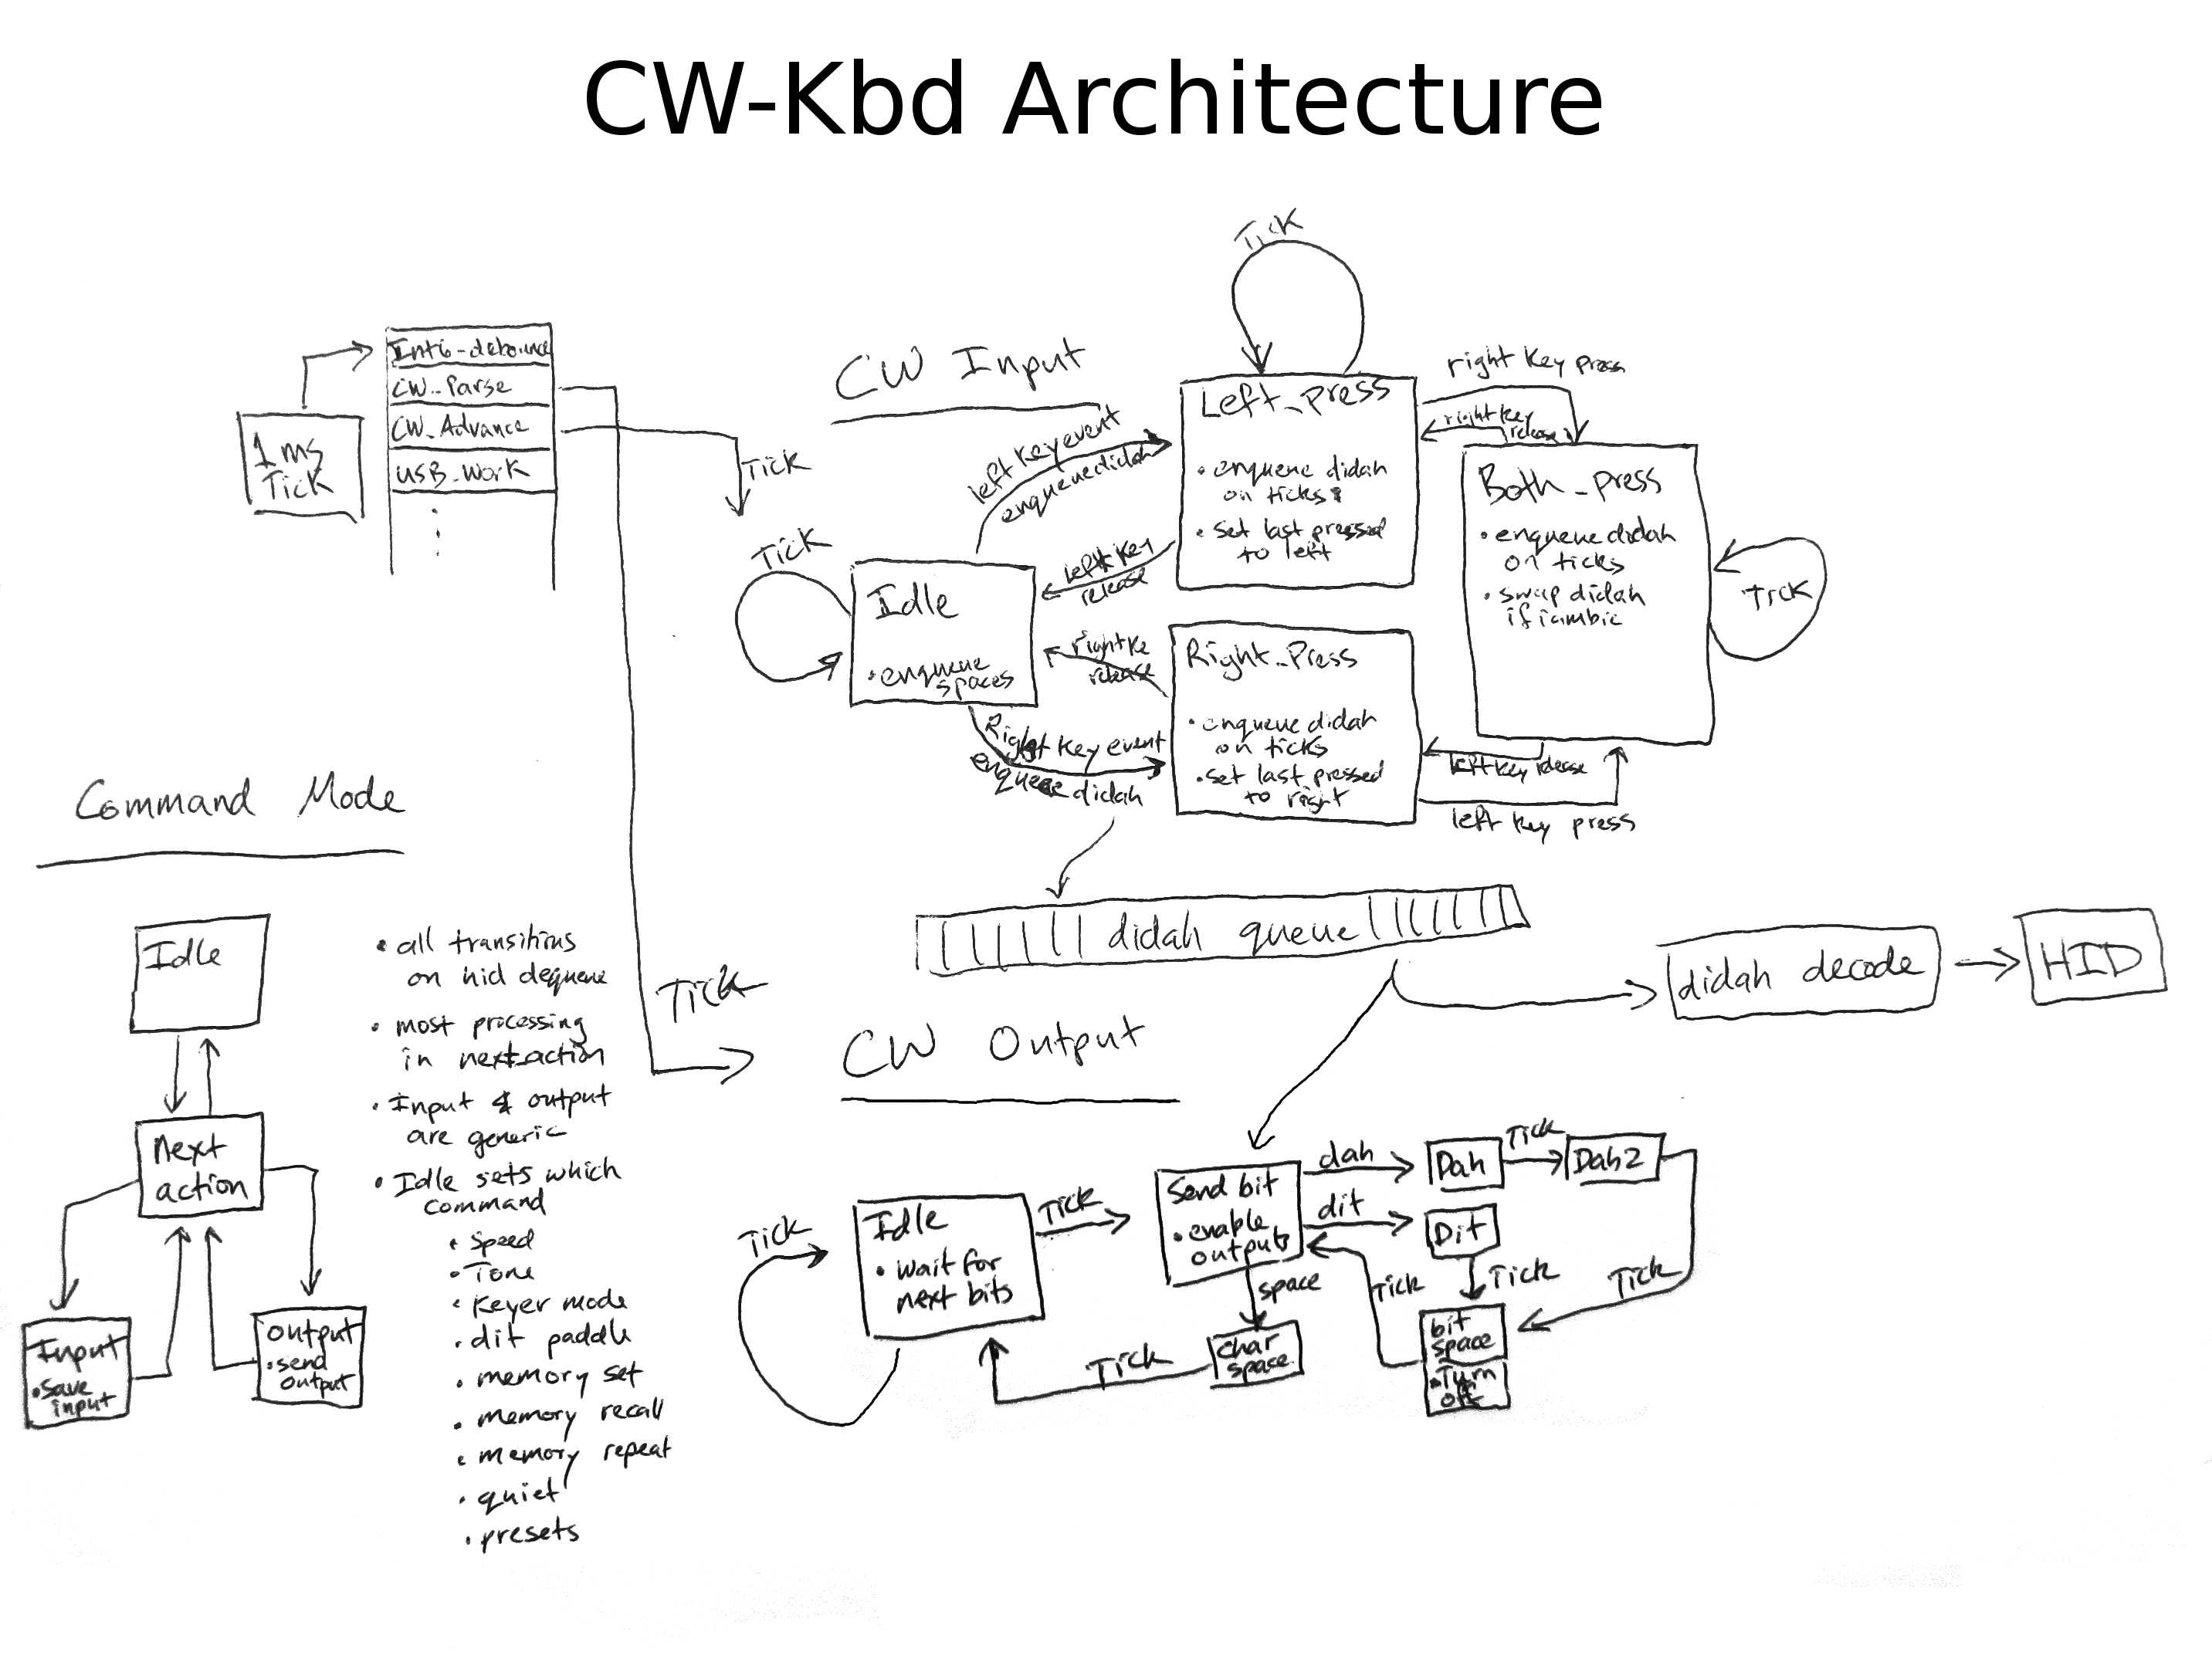
The architecture of the project goes something like this:
paddles intput dits and dahs that get synchronized by the timer. Depending on the keying mode, a continuously pressed paddle may or may not continuously send dits or dahs. Also depending on the keying mode, different things may happen if both paddles get pressed at the same time. The input state machine handles all of this, resulting in a queue of dits, dahs and spaces that are ready to be consumed. The output state machine looks at the queue and sends the bits to the output pins (the buzzer and the paddle/keyer pins) as well as trying to decode the stream of dits, dahs and spaces into characters. Every recognized character gets enqueued into the HID queue, which gets sent off to the computer if it is plugged in. In addition to the two paddles, there is also a single button that can enter and exit "Command Mode." Command mode allows the user to change various parameters such as buzzer frequency, keying speed, keyer mode, paddle orientation, etc. All of these settings are saved in EEPROM, so they are persistent across power losses.