Playing with GPS

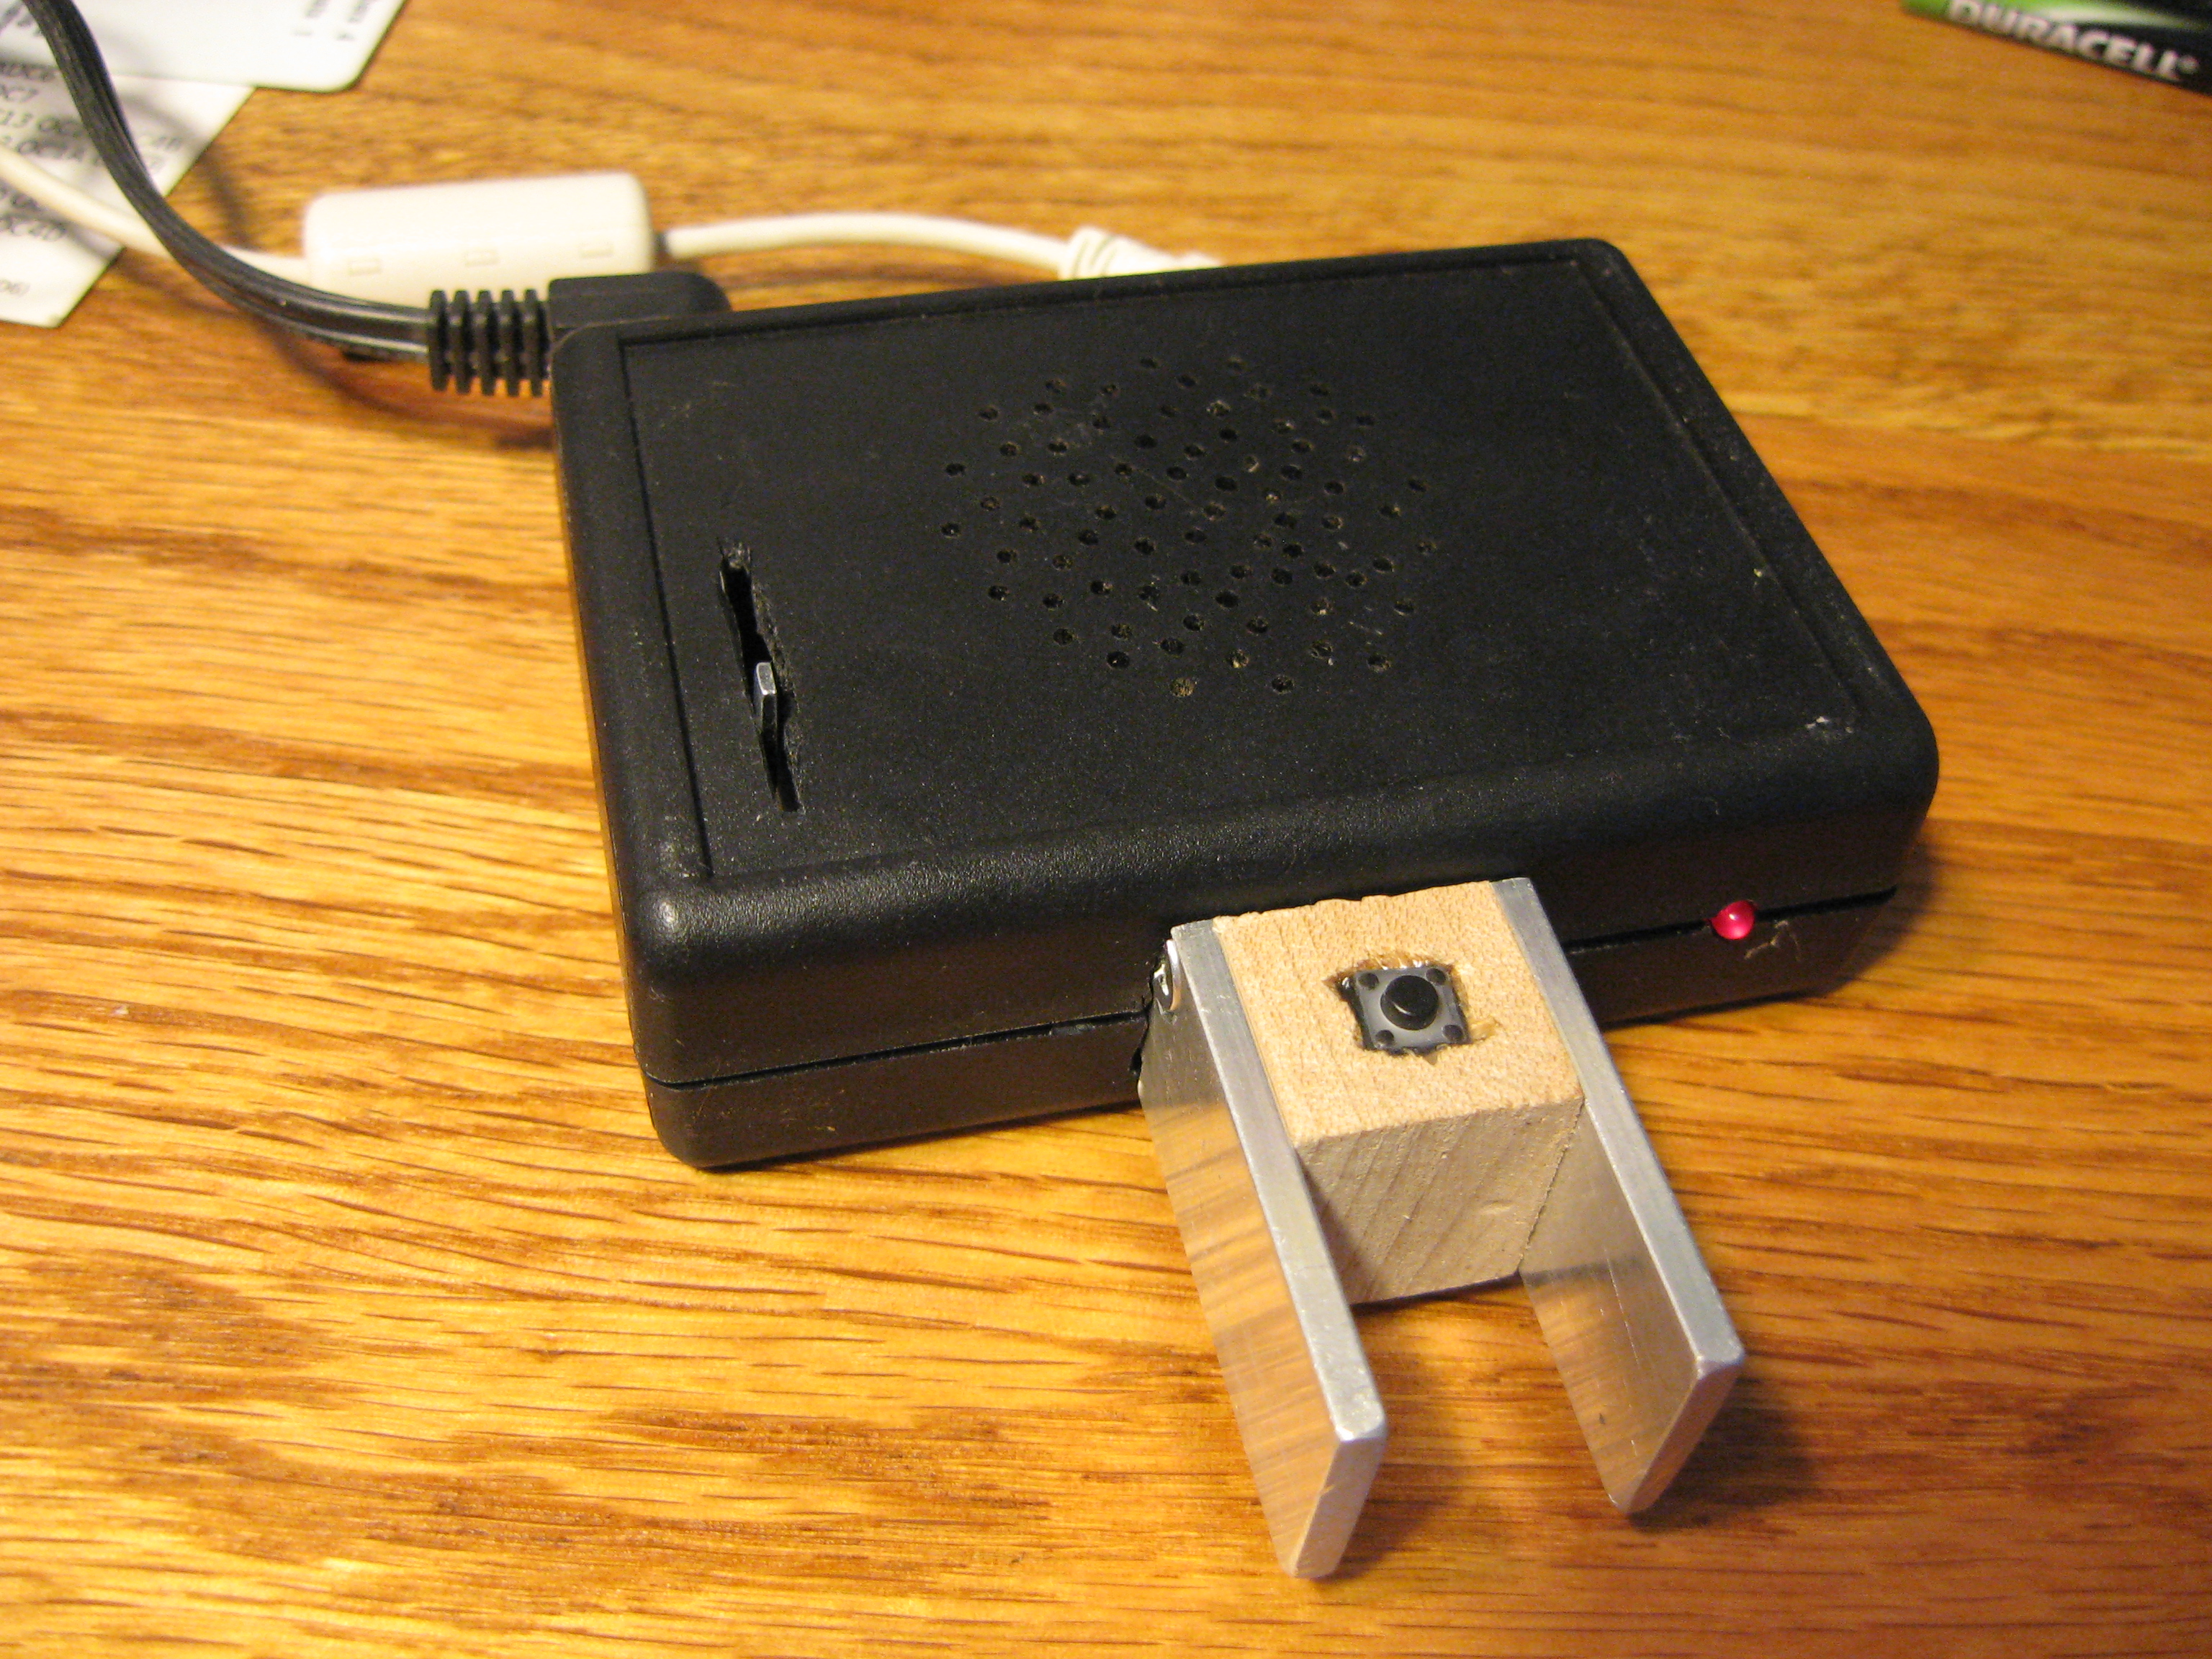
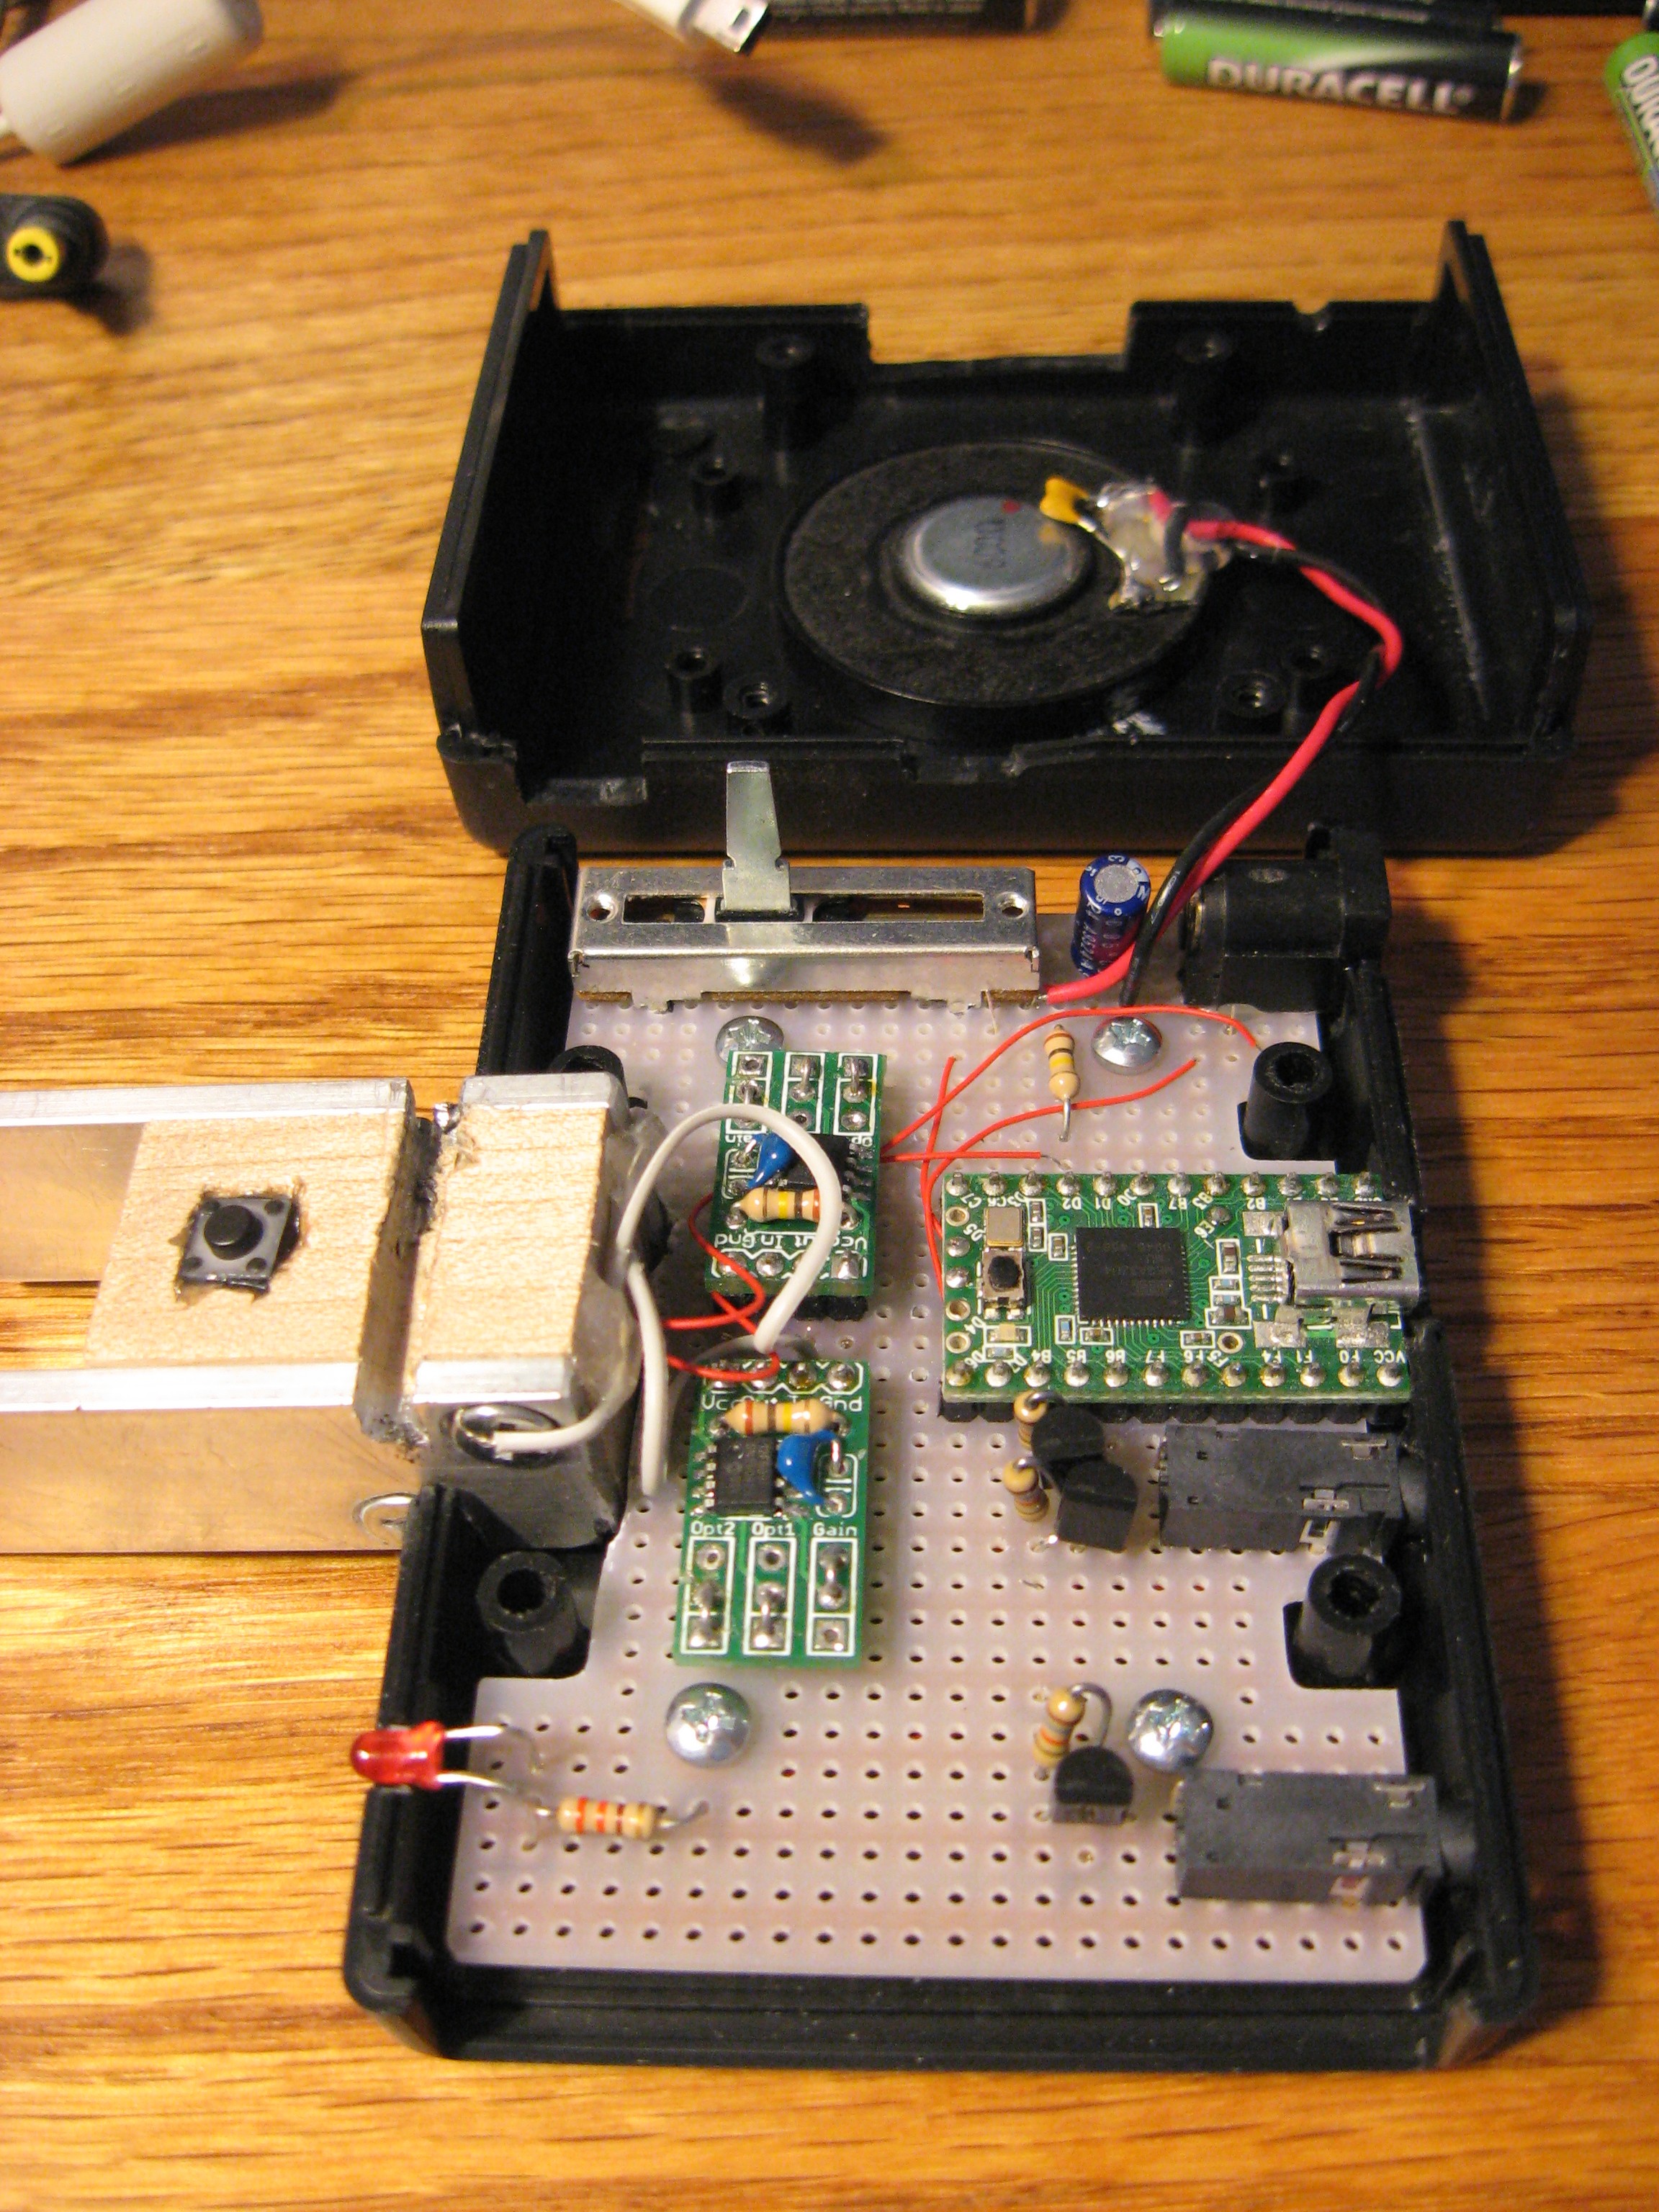
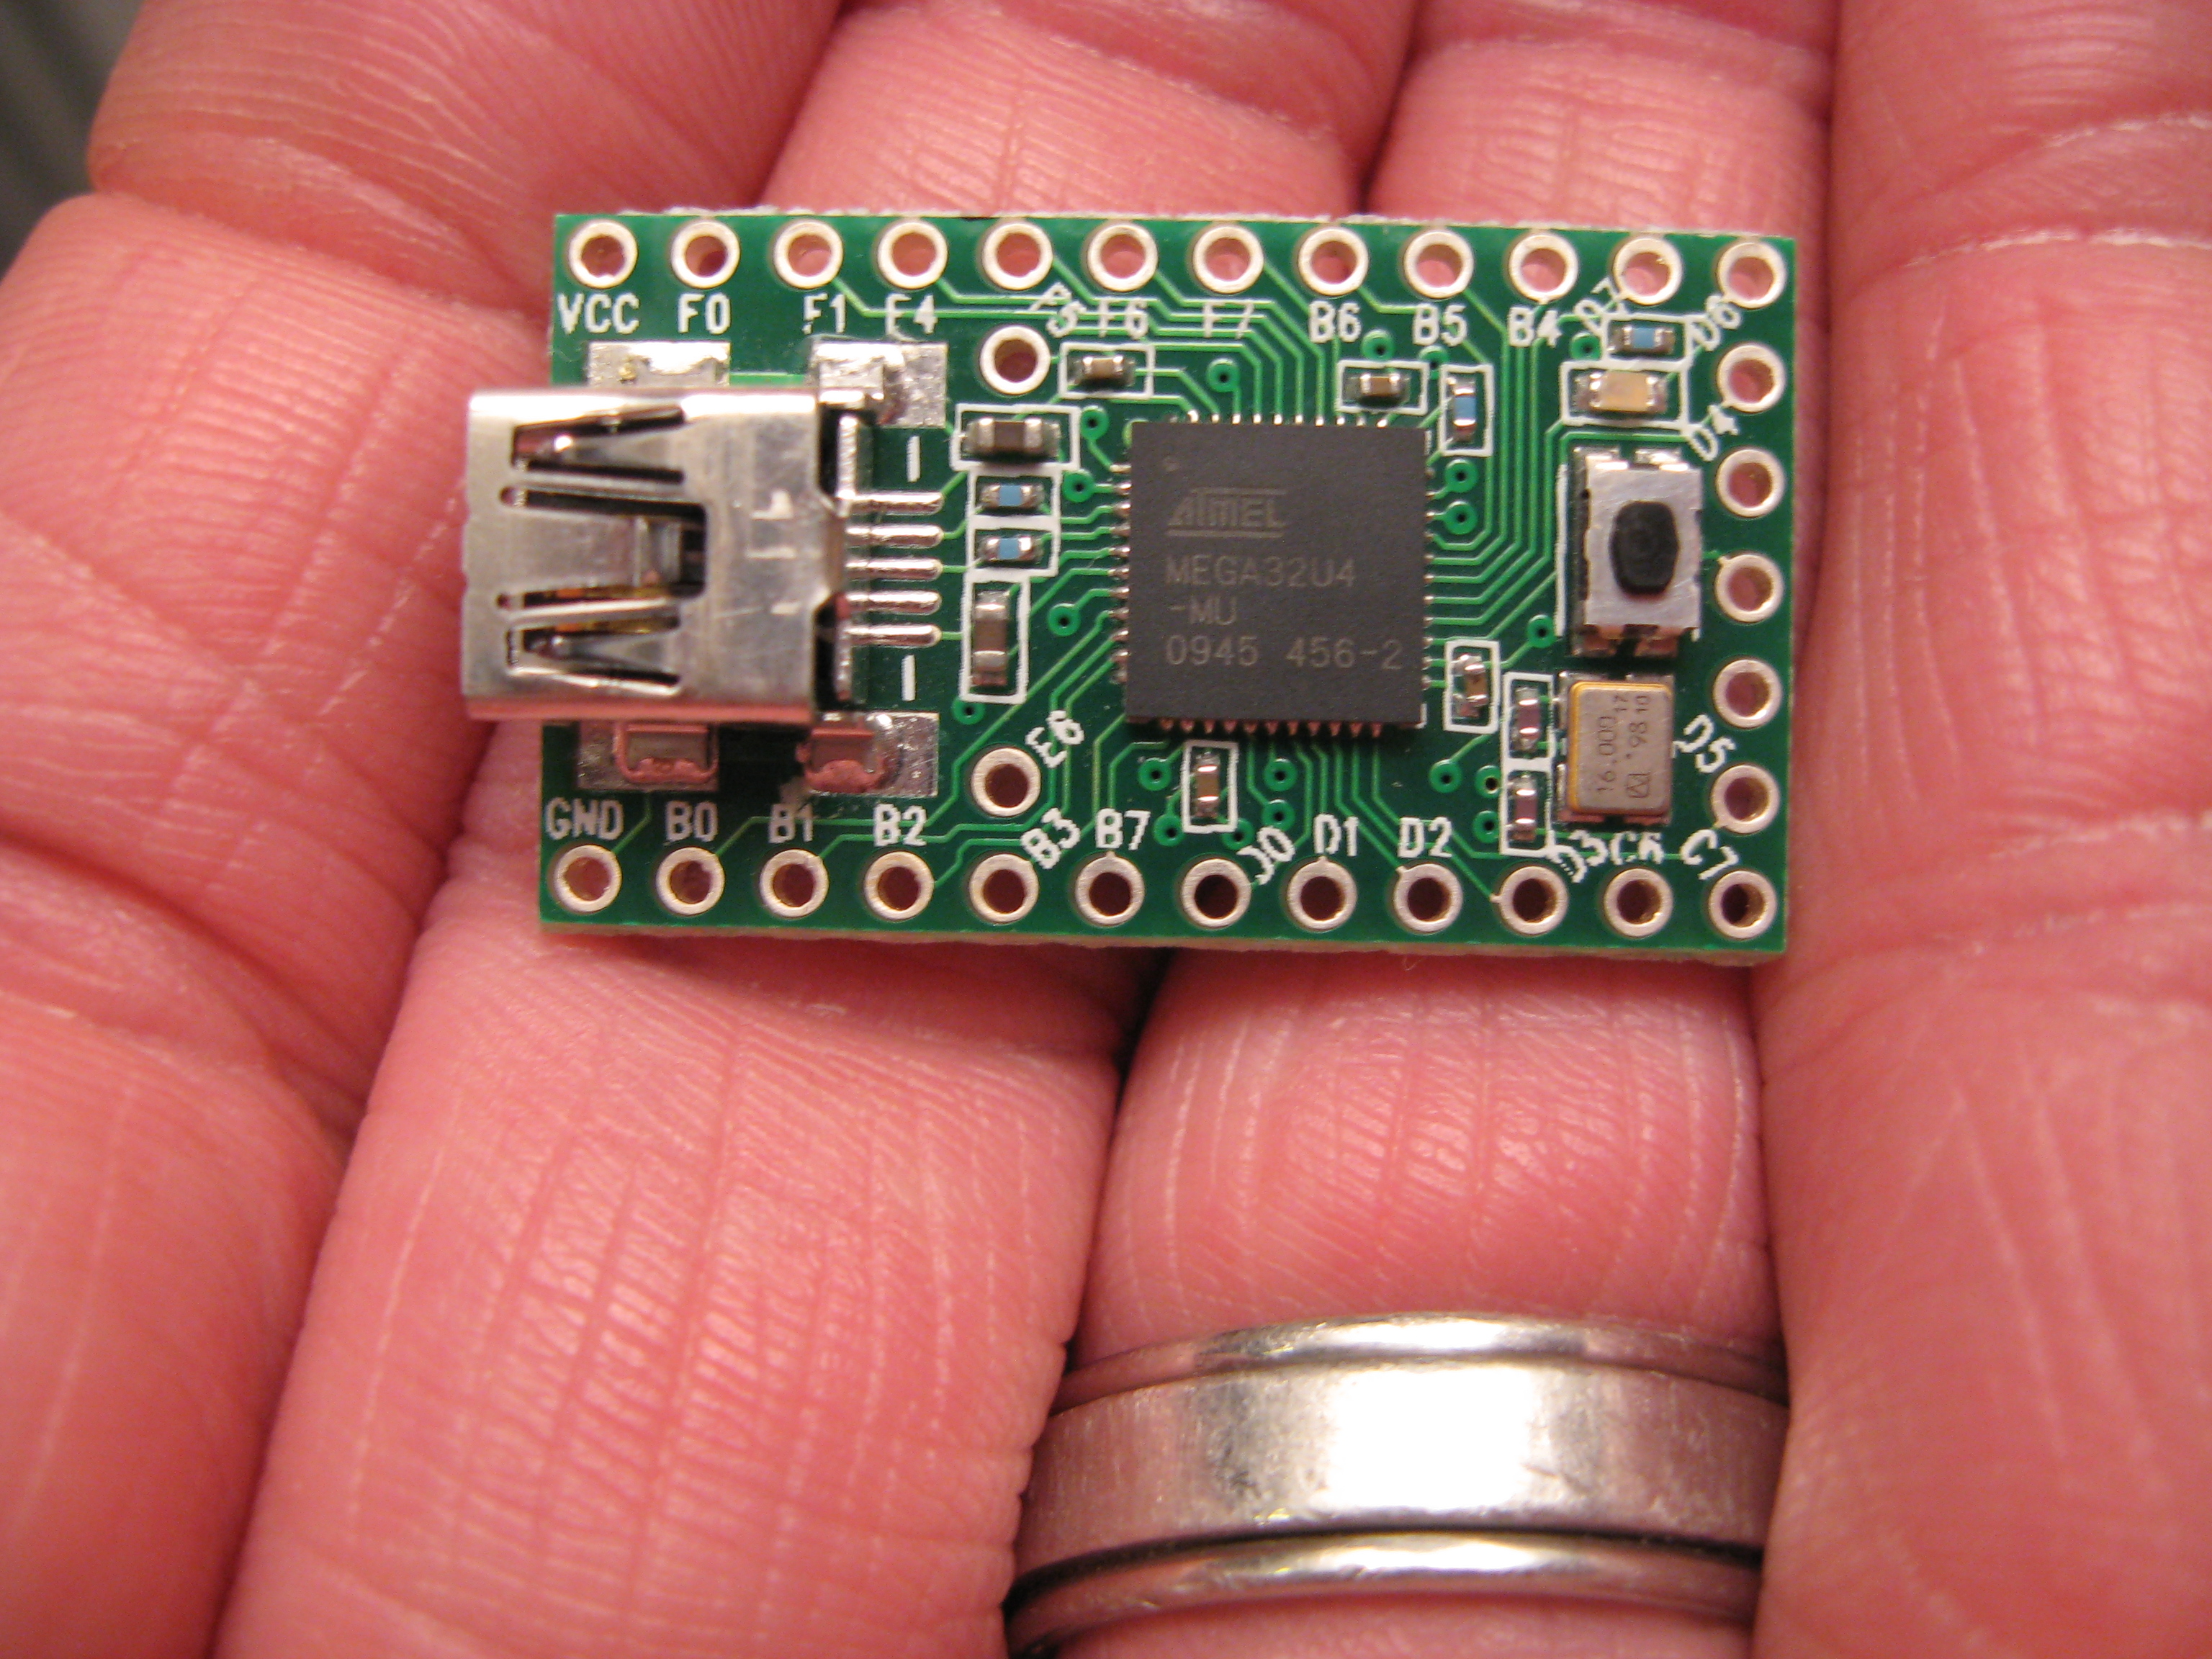
I must have spent too much time hearing the other Elecraft K3 owners talk about fancy precision oscillator stuff because when the idea got into my head that I could make a really ‘simple’ embedded NTP server with the bonus side-effect of a GPS disciplined oscillator, I could not get the idea out of my head. So that is my latest project. I started by reading loads of hardware spec sheets and looking at various required components. Then after I had a pretty good draft of what the plan was, I started ordering engineering samples. The hope was to do this with purchasing as little as possible in the way of parts. So far, I have acquired a good portion of the parts and hope to get a few more before I have to go get the rest on my own.

One of the things I DID purchase was a GPS device. I didn’t want any old GPS receiver, I wanted one that had a 10kHz output that is in sync with the 1 PPS output. Really this meant that I had to go with an older (used) model. But because they are a bit rare these days, that didn’t really save me much in the way of money. I was giddy when it came in the mail. I started poking at it. Documentation was scarce. Finally I figured out that it has an Oncore GPS core in it, which finally led me to some more detailed documentation about the serial interface. After that, it was just a matter of whipping up some software to read and write the necessary packets. Then the fun started. I started logging data and learned how to make use of some of it. I have a handful of commands that I use to set it up and receive location updates, satellite position, and leap second information.

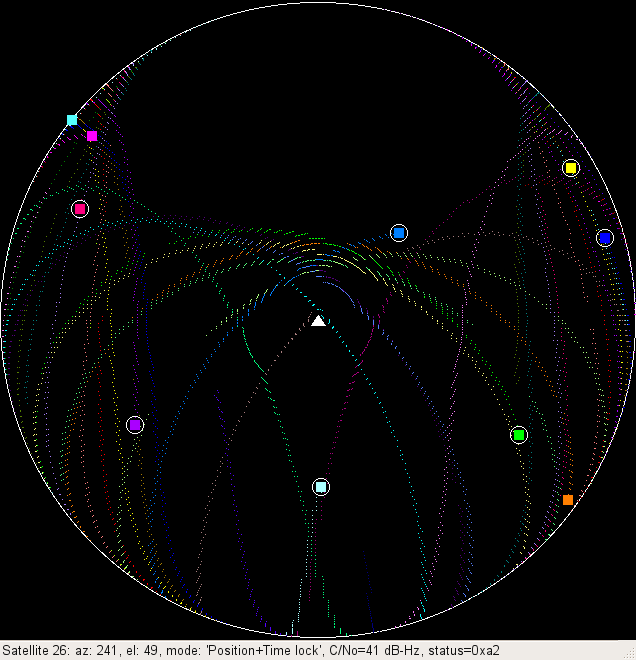
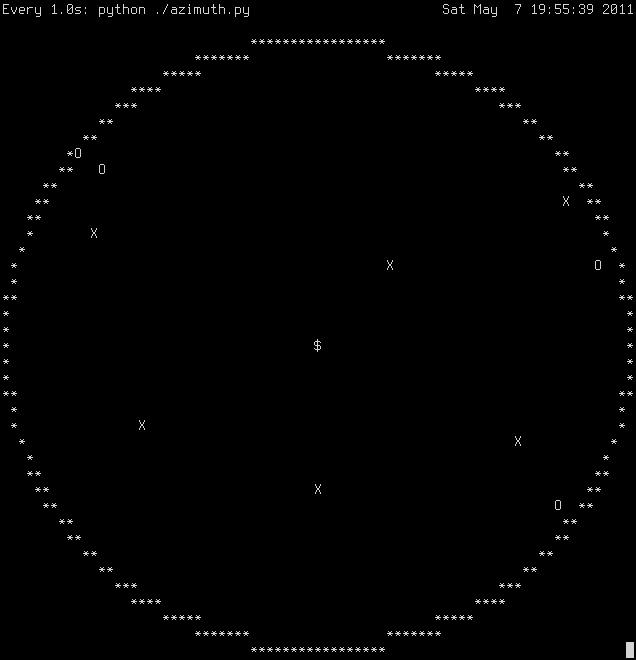
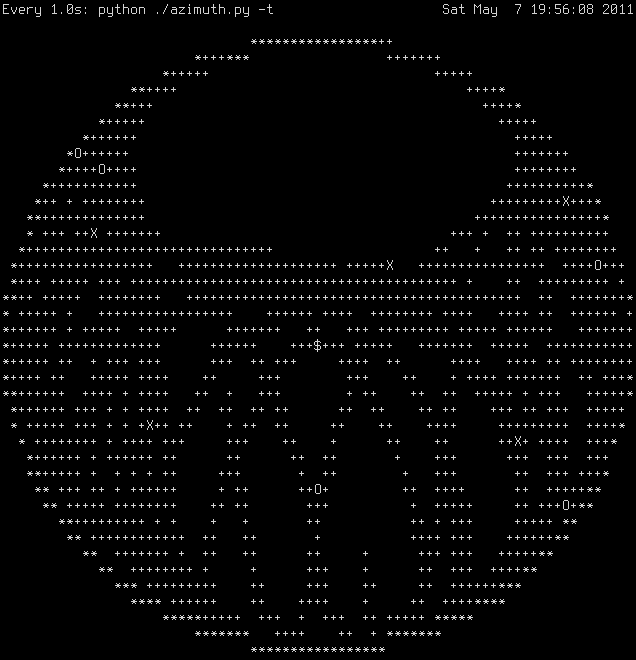
After looking at the location information that the receiver was providing, I moved on to the GPS location. Then I decided to make a tool to visualize the satellite positions. First I did this using ASCII art in the shell (which turned out surprisingly well). Then I added the traces of the satellite positions over the last 24 hours. This showed me some interesting things. First of all, it showed me that I had my plot wrong. (I had the north pole over in the east…. Ooops). Second, it was more a general coverage plot, since characters aren’t quite so precise as pixels. This convinced me to move on to a pixel-based plot, using pygtk. This one started out simple, but got fancier as I realized that it would be easy to add a feature here and a feature there. The gtk version lets you mouse over a satellite and it shows more detail about that satellite, like the ID number, lock status, azimuth and elevation, etc. It also shows the trails of the satellites in dots that are color matched to the squares that represent the satellites. If the satellite is locked, then there is also a circle around it. The plot updates in real time with the changes in the log file from the GPS device.

A USB CW Keyboard

After getting my amateur radio license without having to pass a CW test, I felt a little bit cheated, so I vowed that I would learn CW and do my best to help keep it alive. After all, that is one of the two things that I remember about ham radio from my childhood (beeping and antennas). In the past year and a half, I am sorry to say that I have not yet mastered CW. But I have learned a lot about learning CW. 🙂 Baby steps, right?

Because one reason I decided to get into amateur radio was to give myself an outlet for my tinkering needs, I felt it was only fair that I should devote some of this tinker time to learning CW. How do you do that? By making a touch-sensitive paddle with an iambic keyer. This is what I set out to do about six months ago and am proud to say that I have a working finished product to share today. Much of my inspiration was from the fine folks at CW Touch Keyer. Their products were very alluring and I almost bought one of them instead of building it myself, but they didn’t meet all my requirements. (Their Master Keyer was not available yet, which I think does meet all my requirements except the actual paddle part, which you must supply yourself.)

My design goals:

  • Touch sensitive paddles
  • Act as an USB HID keyboard
  • Small
  • Variable, persistent settings
    • WPM 5-100
    • Variable sidetone frequency 100-1000 Hz
    • Various keyer modes (iambic a/b, ultimatic, bug, etc.)
    • Memories (with auto repeat)

I am happy to report that I have met these goals and more with the N7OH CW-KBD. For the low, low price of $150 you can buy the parts to build your own. I think if I had plans to make this a commercial venture, I would have to cut down on my costs. First to go would likely be the Teensy because if I swapped that out for a Microchip PIC, I could also get rid of the two capacitive touch sensors. Putting that all on a single chip with a small single board, I could certainly reduce the price some. But that is a story for another day.

I started acquiring parts for the keyboard back in the April/May time frame. I started with the basics: I needed the Teensy so I could start tinkering and get back into the AVR embedded programming mode; I needed the capacitive touch sensors so I could get a board designed and start working with them (they only came in tiny surface mount packages so I had to create a breakout board for them); I also ordered some of the other stuff I would eventually need to save on shipping later. Then I excitedly jumped into Eagle and created my breakout board. I actually created a couple of designs. Since ordering with BatchPCB has a base cost plus a per-square-inch cost, I decided that ordering a couple of different designs would not be an issue. And it turns out they sent my twice as many as I ordered (probably because the designs were so small and they had extra room that wouldn’t fit anything else.) That was a really fun process though; I have never designed a PCB before.

I don’t know how many hours I spent reading through the 408-page ATMega32U4 manual. I pulled out some old AVR code I had written in college and tried to make it work. I spent about as much time refactoring the old code as I would have spent writing new stuff. Finally I had some basic hardware support for timers, PWMs, and USB (with the help of LUFA.) From there, I moved back to the non-embedded space to try out the main portion of CW encoding and decoding. First I whipped up a program that would write out the proper timing for dits and dahs if given a string of text to type. It didn’t take very long for that, but it was much faster to have printf and instant feedback without reprogramming a device. I ported this code back to the Teensy (with minimal changes, thanks to my portable coding techniques) and was able to get a simple program up and running that would blink “hello world.” at me once a minute. I moved back to userspace and figured out how to use raw events to emulate interrupts and user timers instead of hardware timers. I extended my program to with a state machine that would read in dit and dah paddle presses and encode them into a stream of CW that can be decoded into ASCII and pushed up to the HID layer. My original state machine was too complex and introduced timing errors into the encoding, so I ditched it for this simpler version.

It took me a while to hunt down all the itty-bitty timing issues. Sometimes there were weird little hiccups in the output that I couldn’t explain. I did finally hunt them down and get smooth operation though. Then I went and filled out the big wish list of coding features (memories, keying modes and speeds, etc.) This took some time but was quite fun. I also found and fixed a few more bugs that I uncovered while I was at it. After I had the list all checked off, I still didn’t have the nerve to permanently affix all the parts. Up until now, they were all connected on a solder-less breadboard. I decided to get crazy and reduce the power consumption. It’s not like it was a pig or anything; it was already using a low-power sleep mode and was completely interrupt driven. I knew that I could reduce the 40mA power requirement with a bit of skillful coding. While it did not have any busy loops, there were a lot of wake-ups that were not needed. For example, part of the architecture is a 1ms timer that allows things to run with a 1ms accuracy. But what if nothing needs to run? It would still fire. I managed to have the things that didn’t need to run inform the timer and then have the timer shut down if there were no users. This meant than if the paddles were not pressed, it would go into a deep sleep state (<10mA) and then would wake up as soon as a paddle was pressed.

Finally, I got brave and soldered all my parts together on a prototyping board and put it in a little plastic case. I drilled holes in all the right places to allow for the connectors (power, USB mini-B, key out, paddle out, an LED, a reset button, the speaker, the volume control, and the paddles). I skillfully mounted the two aluminum paddles on a small block of wood and then cut a groove in them to make them have a solid mechanical connection to the box. I am pretty proud of the box. After I had it all assembled, I realized it was too light weight and would move around whenever I touched the paddles. I fixed this by adding some screws to the bottom so I could screw it to a plate of lexan.

The architecture of the project goes something like this:
paddles intput dits and dahs that get synchronized by the timer. Depending on the keying mode, a continuously pressed paddle may or may not continuously send dits or dahs. Also depending on the keying mode, different things may happen if both paddles get pressed at the same time. The input state machine handles all of this, resulting in a queue of dits, dahs and spaces that are ready to be consumed. The output state machine looks at the queue and sends the bits to the output pins (the buzzer and the paddle/keyer pins) as well as trying to decode the stream of dits, dahs and spaces into characters. Every recognized character gets enqueued into the HID queue, which gets sent off to the computer if it is plugged in. In addition to the two paddles, there is also a single button that can enter and exit "Command Mode." Command mode allows the user to change various parameters such as buzzer frequency, keying speed, keyer mode, paddle orientation, etc. All of these settings are saved in EEPROM, so they are persistent across power losses.

Kenwood TH-D72 and Linux

I recently found a buyer for my Icom IC-92AD, which enabled me to buy one of the new Kenwood TH-D72 radios. This is my first GPS-enabled device and a new radio to boot. I am thrilled. I got it in the mail in just enough time to scan through the instruction manual to figure out how to use it for the Monday night Beaverton CERT Net. I got on the air without any problem. The manual is not nearly as nice as the Icom manual was. First of all, they don’t give you the complete manual printed, only a getting started guide. The manual is on a CD in PDF format.

The TH-D72 has a mini-B USB connector and comes with a cable. Curious, I plugged it in to my computer and saw that it loaded the cp210x driver and gave me a /dev/ttyUSB0 device. Hooray!!! It didn’t work. 🙁 It turns out that the Natty kernel I am running has a regression in it (a story for another day). I tried out the Maverick kernel and it works just fine. So running the Maverick kernel, I was able to open up minicom, set the baud rate to 9600, and establish communication with the radio. It is NOT self discoverable. Grrr. I type in something and it gives me back ‘?’. It appears that there are two modes. With the packet12 TNC enabled, it will echo your keystrokes and give you a ‘cmd:’ prompt. If you type something wrong, it will say ‘?EH’. Without the TNC enabled, it does not echo keystrokes and will give you a ‘?’ if it did not understand the command you sent it.

Not seeing an obvious way to figure out the command set, I figured that we should try to reverse engineer it. I installed the MCP-4A program in wine. I tried to run it and it complained that it needed .NET 2.0. I tried installing dotnet20 and found that is not quite enough — it wants dotnet20sp1 or greater. dotnet20sp2 does not install. dotnet30 does not install. When I run MCP-4A with dotnet20, it throws a few errors and does not give me full use of the program (no menubar, for example), but it does run. I was able to use Wireshark to sniff the USB traffic as I performed a read and write. Then I turned to python to whip up something that can do this natively. This is what I have so far:


#!/usr/bin/python
# coding=utf-8
# ex: set tabstop=4 expandtab shiftwidth=4 softtabstop=4:
#
# © Copyright Vernon Mauery, 2010. All Rights Reserved
#
# This is free software: you can redistribute it and/or modify it
# under the terms of the GNU Lesser General Public License as published
# by the Free Software Foundation, either version 3 of the License, or (at
# your option) any later version.
#
# This sofware is distributed in the hope that it will be useful, but WITHOUT
# ANY WARRANTY; without even the implied warranty of MERCHANTABILITY or
# FITNESS FOR A PARTICULAR PURPOSE. See the GNU Lesser General Public
# License for more details.
#
# You should have received a copy of the GNU Lesser General Public License
# along with this software. If not, see .

def command(s, command, *args):
cmd = command
if args:
cmd += " " + " ".join(args)
print "PC->D72: %s" % cmd
s.write(cmd + "r")

result = ""
while not result.endswith("r"):
result += s.read(8)

print "D72->PC: %s" % result.strip()

return result.strip()

def l2b(*l):
r = ''
for v in l:
if type(v) is str:
r += v
else:
r += chr(v)
return r

def bin2hex(v):
r = ''
for i in range(len(v)):
r += '%02x '%ord(v[i])
return r

def bin_cmd(s, rlen, *b):
if b is not None:
cmd = l2b(*b)
else:
cmd = ''
print "PC->D72: %s" % cmd
s.write(cmd)
result = bin2hex(s.read(rlen)).strip()
print "D72->PC: %s" % result
return result

def usage(argv):
print "Usage: %s " % argv[0]
sys.exit(1)

if __name__ == "__main__":
import serial
import sys

if len(sys.argv) < 3:
usage(sys.argv)

s = serial.Serial(port=sys.argv[1], baudrate=9600, xonxoff=True, timeout=0.25)

#print get_id(s)
#print get_memory(s, int(sys.argv[2]))
print command(s, 'TC 1')
print command(s, 'ID')
print command(s, 'TY')
print command(s, 'FV 0')
print command(s, 'FV 1')
print bin_cmd(s, 4, '0M PROGRAMr')
s.setBaudrate(57600)
s.getCTS()
s.setRTS()
of = file(sys.argv[2], 'wb')
for i in range(256):
sys.stdout.write('rfetching block %d...' % i)
sys.stdout.flush()
s.write(l2b(0x52, 0, i, 0, 0))
s.read(5) # command response first
of.write(s.read(256))
s.write('x06')
s.read()
print
of.close()
print bin2hex(s.read(5))
print bin2hex(s.read(1))
print bin_cmd(s, 2, 'E')
s.getCTS()
s.setRTS()
s.getCTS()
s.getCTS()
s.close()

You run it like this:

$ python thd72.py /dev/ttyUSB0 d72-dump.dat

Unfortunately from what I have seen, two consecutive reads without any changes on the radio seem to have very big differences. It is as though some of the chunks of the file are rotated or shifted by a few bytes (and the shift is not constant throughout). Not seeing an immediate reason for this, I suspect that it is some form of obfuscation. Call me a pessimist.

I will continue to work on this, but I would love to see what others in community are doing as well.

Update:

I forgot to mention that the whole point of this exercise was to find a way to work it into CHIRP. I am currently working on a driver for this radio to enable it in CHIRP. And as I was looking over the tmv71 code in CHIRP, I noticed that I should be reading a response to the read block command _before_ I actually read the block data. This seems to help things out a bit (and I modified the above code to match).

Tame your bash history

I am a packrat, but I do like a bit of order. This makes maintaining my bash history difficult. There are some commands that I use frequently that seem to fill up my history file making it hard to keep some of the lesser used, yet very important commands in the history. Finally sick of the problem, I poured over the manpage for bash and found the section on HISTCONTROL. From the description there, I found that this along with HISTIGNORE, I can almost eliminate my problem of my bash history getting too full of stupid common commands.

I added this to my ~/.bash_profile:


export HISTIGNORE="&:ls:[bf]g:disown:cd:cd[ ]-:exit:^[ t]*"
export HISTCONTROL=ignoredups:ignorespace:erasedups
export HISTFILESIZE=2000

Here is the snippet from the bash manual that corresponds to these controls:

       HISTCONTROL
A colon-separated list of values controlling how commands are saved on the history
list. If the list of values includes ignorespace, lines which begin with a space
character are not saved in the history list. A value of ignoredups causes lines
matching the previous history entry to not be saved. A value of ignoreboth is
shorthand for ignorespace and ignoredups. A value of erasedups causes all previous
lines matching the current line to be removed from the history list before that
line is saved. Any value not in the above list is ignored. If HISTCONTROL is
unset, or does not include a valid value, all lines read by the shell parser are
saved on the history list, subject to the value of HISTIGNORE. The second and sub-
sequent lines of a multi-line compound command are not tested, and are added to the
history regardless of the value of HISTCONTROL.
HISTFILESIZE
The maximum number of lines contained in the history file. When this variable is
assigned a value, the history file is truncated, if necessary, by removing the old-
est entries, to contain no more than that number of lines. The default value is
500. The history file is also truncated to this size after writing it when an
interactive shell exits.
HISTIGNORE
A colon-separated list of patterns used to decide which command lines should be
saved on the history list. Each pattern is anchored at the beginning of the line
and must match the complete line (no implicit `*' is appended). Each pattern is
tested against the line after the checks specified by HISTCONTROL are applied. In
addition to the normal shell pattern matching characters, `&' matches the previous
history line. `&' may be escaped using a backslash; the backslash is removed
before attempting a match. The second and subsequent lines of a multi-line com-
pound command are not tested, and are added to the history regardless of the value
of HISTIGNORE.

Radio Frequency Exposure (RFE) Calculator

So far in my amateur radio career, I have not been able to offer much that may be of use to other hams. That changes today. A while back, when I was dreaming about where to put my antennas safely, I did a lot of research about radio frequency exposure. I poured over OET Bulletin 65, which details the FCC’s limits on human exposure to RF electromagnetic fields. They have formulas and tables and forms to fill out. It is all wonderful and fine, if you live in the 1960s. Welcome to the 21st Century. We live in a world of computers to do all that number crunching for you. I looked around for any web-based things that would help, but the closest I could find was power density calculator written by W4/VP9KF. This is fine if you want to do it for EVERY band on EVERY transmitter each time you make a change to your station. Plus, it means that I have to transmit all that data to his PHP script, which does the calculations and sends them back. We have this great thing in web browsers called JavaScript, which is more than powerful enough to do the work. I set upon creating a JS-only version of his creation. But it still lacked the memory—I would still need to re-enter for each band for every change. And it wouldn’t let me view multiple bands at once. Bigger calculator!

This is where my offering steps in. My requirements:

  1. Save my data so I don’t have to re-enter everything in every time
  2. Something I can share with others, without saving their data on my server
  3. Let me add, edit, delete at will
  4. Something that can show all my transmitter/antenna/connection information at once

Seems easy enough, right? It was the first two that really got me stuck. I whipped up a little JavaScript ditty that fulfilled number four in very little time at all. Number three was dependent upon the first two and was technically the hardest, but once I had the first two figured out, it was only coding, which I enjoy.

And this is what I came up with: N7OH RFE Calculator. Take it for a spin, share it with your friends. Upon your initial visit, it may not look like much, but if you move over to the “Import/Export” tab, you can press the “Reset to sample data” button and see it in action. Please offer suggestions and comments if you find it to be too difficult to use or see something that might make it better.

As for fulfilling my four requirements, the first two were done once I learned about local storage with HTML 5. This means that your web browser is storing the data. Not as a cookie, but similar. Cookies get sent back to the server with each request. Local storage is meant to be persistent data that a web page can access via JavaScript to be used locally. This means I can save my data on my machine and your data on your machine. I can host the page for everyone, yet not save everyone else’s data on my server. The add/edit/delete requirement was probably the most fun I have had with jQuery to date. And I hardly scratched the surface of what it can do. Lastly, the glory of the Results tab just makes me weak in the knees. Okay, not really, but it is the crown jewel of the whole application. It shows all the stuff you want to know about your radio setup.

AVR junkie paradise

I have been pining for some shiny tiny hardware that would look good in the CW (Morse code) paddle that I am making. Arduino had been a first choice for several days. I was on the verge of buying a couple of boards when I came across PJRC’s Teensy. It really is teensy. But it incorporates a little bit of hardware that I had not seen in a proto-board before: Atmel’s 8-bit MCU with USB support. The Teensy has the Mega32U4 processor at its core, which has 32kB of flash, 2.5kB SRAM, and 1kB EEPROM, support for up to 6 USB full-speed functions, and lots more of the standard AtMega goodies. I think one of the coolest things about this board is that once you have a bootloader in place, you can flash the system over the USB connection that is already has. No need for an extra programmer and more cables. And even if you screw up your application, the bootloader is safe, because it is protected by separate lock bits.

To make a short story even shorter, I ordered two Teensy boards over the weekend and they arrived today. Fast shipping. (It helps that PJRC is less than 20 miles away.)

I am in Atmel junkie paradise.

Training My First Mutt

At work, I deal with a lot of mail. Not as much as some people, but still, it is a non-trivial amount. I don’t have to respond to all of it, nor is it all of the same importance. For example, I get emailed by various cron jobs, some of which are critical to read and others are more informational. All in all, it averages out to 60-80 emails a day, depending on how crazy things are. This adds up fast, with the last two years each landing about 14,000 emails. Since I need to keep my email, I am getting quite a stash — about 51,000 messages totalling 1.2GB. How in the world do you keep that organized? More importantly, what mail client can present all those without choking?

When I first started my current job, I chose Evolution, since that was about the best thing at the time. But somehow, it got dumber. Each new release took away features that I had come to love and depend on. When it started changing the key bindings without allowing me to have a say in the matter, I finally gave up and went with Kontact and Kmail. There are some things about KDE that I really like. One of the things is how customizable things are. I set all my key bindings so things worked for me. By this time, I had accumulated a fair amount of email and I noticed that it took a second or two to change folders. Annoying, but I just dealt with it. But on one of my upgrades, I noticed that Kmail was constantly crashing. That is beyond annoying. I moved to Thunderbird. I installed the Lightning extension to allow me to integrate my calendar with my email client like Evo and Kontact. Another year or two goes by and I notice a sufficient number of things about Thunderbird that drive me nuts. Time to move again. I look through the options. I test some out. But they all are SO SLOW.

I start looking at some of the second-tier mail clients, you know, the ones that only have a small following, like Sup, and Notmuch. I like a lot of things about both of those, but neither one is really ready to handle my abusive behavior. They both have powerful searching using the Xapian engine. They both deal very well in threads. Sup even has a UI. Notmuch doesn’t have a UI. I wrote the beginnings of one and decided that there was still way to far to go before I could really use it. I threw my hands up and adopted a Mutt.

Mutt is really a full featured MUA. It doesn’t speak SMTP, it only knows how to speak with a local process such as the venerable Unix Sendmail program. This is perfectly okay, since there are any number of ways to get around this. I chose MSMTP, which runs like sendmail and then makes an SMTP connection to your configured MTA to actually get your mail out there. So my entire mail stack looks something like this:

We have any number of IMAP servers to collect incoming mail. Fetchmail contacts the servers and delivers the mail to my local machine, filtering and tagging the messages on the way. Mutt notices the newly delivered mail and I read it. I reply or send mail and Mutt passes it off to MSMTP, which looks at the envelope from address and chooses the appropriate SMTP server to contact and pass the message off to. The entire stack suits me quite nicely. Each piece does its thing well and does not depend on the other pieces being of any particular brand. I am now free!

But let me tell you, taming your first Mutt is a non-trivial process. I still have not read the entire 12,000 line manual, but I have read much of it, some parts many times. I have spent many hours learning how Mutt does things, what I can change (almost anything) and what I can’t change (very little), customizing key bindings, writing macros, etc. I finally feel like my Mutt and I are getting along. One of the things I really LOVE about my Mutt is that I get to use a *real* editor to compose my mail. Not some clunky built-in, unconfigurable, piece of junk. I use VIM to compose my mail. With a few key settings, it even does syntax highlighting (mail headers, quoted text, etc.), spellchecking and automatic line wrapping for my typed text. It also allows me to paste verbatim text in without messing up its format. I can paste a patch in without whitespace mangling. Hooray. How many other email composers allow this? None that I know of. You don’t like VIM? You can use any editor you like.

When I first switched to Mutt, I was considering writing up a patch that would work with labels, giving me virtual folders for my labels. But after exploring the current label support that Mutt has, I found that to be uneccessary. All my incoming mail get passed through fetchmail, which does filtering and delivery. Part of my filtering process is to remove the junkmail and tag all the rest of the mail with labels according to some regular expressions. I have a little script I wrote that will read the headers of a message and spit out the ‘X-Label:’ header to add to the message. Once delivered, Mutt caches this in its header cache, making for some VERY speedy searches by label. Not only can it search by labels, but it has a very powerful search pattern language. For example, I can limit my view of my messages to ‘~(~d 6m-8m*2w ~f (“telly”|”cookie”) ~Z >1M ~s recipe)’ which means “all messages from threads containing messages from ‘telly’ or ‘cookie’ with dates from 6 to 8 months ago, plus or minus 2 weeks, that were larger than one megabyte and had recipe in the subject”. Tell me this is not a powerful search engine. All of those things it can do without actually re-reading the messages because of the header cache. Some of the modifiers do force Mutt to actually read the messages (like ~b or ~B, which end up searching the body of the message). The header cache does not save all the headers, only the ones that Mutt deems important. Personally, I think this should be configurable.

Besides the Mutt manual (available online at http://www.mutt.org/doc/manual/ or included with your Mutt installation (Debian/Ubuntu users can press F1)), there are loads of online resources to help configure and train your Mutt. I found this site to be very helpful: My First Mutt.

If you are curious what I have done, drop me a note, leave a comment or something and I will share configs or whatever with you. In the mean time, I have some mail to read.

[Edited 27 Jan 2010] Fabio wanted to see my config and my label script, so here goes… A little insight to the twisted mind of Vernon.

Awake the sleeping giant

As I was reading my daily quota of SlashDot a few days ago, I stumbled across a very intriguing sci-fi story called Engineers’s Dreams by George Dyson. The fact that he could not get it published in any science journals because it is fiction and that he could not get it published in any fiction venues because it was too technical just makes me laugh. In fact that is half the reason I was intrigued enough to read it. That and it is a story about Google.

If you have an inner geek in you, go ahead and read it. You know it is more than mere fiction.

IPv6 regex

I spent too much time today playing with IPv6 stuff that I didn’t have any time to work on my latest time sink, Pyrobox. I will have to write about that some other time.

For now, I wanted to get this out there. I was curious about how easy it was to confirm that a string is a valid IPv6 address. It turns out that it is not so simple, thanks to the “space saving” techniques of zero folding that is used. Here are some examples of IPv6 addresses that are valid:

::                           unspecified address
::1                          localhost
fe80::219:7eff:fe46:6c42     link local address
::00:192.168.10.184          embedded IPv4 address

Yes, those are just some of the variety that was introduced that makes the protocol easier to use from a high level, but harder to implement and use from a low level. I mean, I tell my router to advertise IPv6 addresses and within seconds all the machines on the LAN have configured themselves with globally routable IPv6 addresses. Impressive. Yet so very *not* human friendly. There is no way around it, when you are dealing with 128 bits, it is a lot of data to put in a human readable format. That’s what the 8 sets of quad-byte segments are all about, human readability, but it is still so long, nobody will be able to spout off their IP address like they can with IPv4. Thankfully nameservers should help out with that. But sometimes we will have to deal with IPv6 addresses and I want to know how easy it is to recognize a true address from a fake.

I wrote a little ditty in python to help me conceptualize it. I found several sites that had similar regexes to this Ruby parser. I was somewhat dismayed to find out that while they successfully classify a bunch of the namespace correctly, they also have an infinite set of bad addresses they classify as good. Oops. Time to look at your regex handbook again, folks. To remedy their situation is not so easy though. Here is the python program I wrote that generates a regex:

 import re

def valid_ipv6(addr, debug=False):
	# we will build an array of matches and then join them
	a = []
	# the simplest match in the ipv6 address
	sm = r'[0-9a-f]{1,4}'
	for i in range(1,7):
		a.append(r'A(%s:){1,%d}(:%s){1,%d}Z' % (sm, i, sm, 7-i))
	a.append(r'A((%s:){1,7}|:):Z' % sm)
	a.append(r'A:(:%s){1,7}Z' % sm)
	a.append(r'A((([0-9a-f]{1,4}:){6})(25[0-5]|2[0-4]d|[0-1]?d?d)(.(25[0-5]|2[0-4]d|[0-1]?d?d)){3})Z')
	# support for embedded ipv4 addresses in the lower 32 bits
	ipv4 = r'(25[0-5]|2[0-4]d|[0-1]?d?d)(.(25[0-5]|2[0-4]d|[0-1]?d?d)){3}'
	a.append(r'A((%s:){5}%s:%s)Z' % (sm, sm, ipv4))
	a.append(r'A(%s:){5}:%s:%sZ' % (sm, sm, ipv4))
	for i in range(1,5):
		a.append(r'A(%s:){1,%d}(:%s){1,%d}:%sZ' % (sm, i, sm, 5-i, ipv4))
	a.append(r'A((%s:){1,5}|:):%sZ' % (sm, ipv4))
	a.append(r'A:(:%s){1,5}:%sZ' % (sm, ipv4))
	bigre = "("+")|(".join(a)+")"
	if debug:
		for i in range(len(a)):
			r = re.compile(a[i], re.I)
			if r.search(addr):
				print a[i]
		print "n%s" % bigre
	bigre = re.compile(bigre, re.I)
	return bigre.search(addr) and True

if __name__ == '__main__':
	import sys
	if len(sys.argv) < 2:
		print "usage: %s "%sys.argv[0]
		sys.exit(1)
	
	if valid_ipv6(sys.argv[1], True):
		print "valid"
		sys.exit(0)
	else:
		print "invalid"
		sys.exit(1)

When it runs, it can print out the final regex (which embodies the entire IPv6 address language as far as I can tell). Here is that regex:

(A([0-9a-f]{1,4}:){1,1}(:[0-9a-f]{1,4}){1,6}Z)|
(A([0-9a-f]{1,4}:){1,2}(:[0-9a-f]{1,4}){1,5}Z)|
(A([0-9a-f]{1,4}:){1,3}(:[0-9a-f]{1,4}){1,4}Z)|
(A([0-9a-f]{1,4}:){1,4}(:[0-9a-f]{1,4}){1,3}Z)|
(A([0-9a-f]{1,4}:){1,5}(:[0-9a-f]{1,4}){1,2}Z)|
(A([0-9a-f]{1,4}:){1,6}(:[0-9a-f]{1,4}){1,1}Z)|
(A(([0-9a-f]{1,4}:){1,7}|:):Z)|
(A:(:[0-9a-f]{1,4}){1,7}Z)|
(A((([0-9a-f]{1,4}:){6})(25[0-5]|2[0-4]d|[0-1]?d?d)(.(25[0-5]|2[0-4]d|[0-1]?d?d)){3})Z)|
(A(([0-9a-f]{1,4}:){5}[0-9a-f]{1,4}:(25[0-5]|2[0-4]d|[0-1]?d?d)(.(25[0-5]|2[0-4]d|[0-1]?d?d)){3})Z)|
(A([0-9a-f]{1,4}:){5}:[0-9a-f]{1,4}:(25[0-5]|2[0-4]d|[0-1]?d?d)(.(25[0-5]|2[0-4]d|[0-1]?d?d)){3}Z)|
(A([0-9a-f]{1,4}:){1,1}(:[0-9a-f]{1,4}){1,4}:(25[0-5]|2[0-4]d|[0-1]?d?d)(.(25[0-5]|2[0-4]d|[0-1]?d?d)){3}Z)|
(A([0-9a-f]{1,4}:){1,2}(:[0-9a-f]{1,4}){1,3}:(25[0-5]|2[0-4]d|[0-1]?d?d)(.(25[0-5]|2[0-4]d|[0-1]?d?d)){3}Z)|
(A([0-9a-f]{1,4}:){1,3}(:[0-9a-f]{1,4}){1,2}:(25[0-5]|2[0-4]d|[0-1]?d?d)(.(25[0-5]|2[0-4]d|[0-1]?d?d)){3}Z)|
(A([0-9a-f]{1,4}:){1,4}(:[0-9a-f]{1,4}){1,1}:(25[0-5]|2[0-4]d|[0-1]?d?d)(.(25[0-5]|2[0-4]d|[0-1]?d?d)){3}Z)|
(A(([0-9a-f]{1,4}:){1,5}|:):(25[0-5]|2[0-4]d|[0-1]?d?d)(.(25[0-5]|2[0-4]d|[0-1]?d?d)){3}Z)|
(A:(:[0-9a-f]{1,4}){1,5}:(25[0-5]|2[0-4]d|[0-1]?d?d)(.(25[0-5]|2[0-4]d|[0-1]?d?d)){3}Z)

Yes, I realize that is one big regex (note that the lines should all really be concatenated, but I broke it apart at the | points to make it easier to read). But I think it is more complete and correct than other regexes that google helped me to find. If anyone knows a better way to do this using some regex fu, please let me know.

MythTV + MediaMVP = Time Shifted Television

I have long been slightly jealous of Darren’s MythTV setup. I kept telling myself that I have enough other projects (a.k.a. kids) to keep myself busy for the next 18 years. Plus, the VCR and TV have always been fine for our needs and up until about a month ago were working fine. The TV has never really been what I would call a great piece of electronic equipment. A great piece of something. But it was free and I can’t argue with that. It still works if not for its slightly discolored screen. The VCR is in the same boat. But it finally did give up the ghost. First it stopped rewinding tapes and then it stopped recording. So I tossed it. But that left us without a way to record Sesame Street. Dun dun dun…

Ever since the invention of the VCR, Americans have loved the ability to watch Time Shifted Television (TST). Two shows you want to watch are always on at the same time. Record one and watch the other; then watch the second show at your leisure. Simple solution. Enter the digital age. Hello TiVo. Thank you, Richard Stallman, for telling it how it is. Goodbye TiVo, hello MythTV. MythTV was created by a guy that didn’t want to have to pay the costly startup fees and crazy monthly fees associated with a commercial Digital Video Recorder (DVR) so he wrote his own software that runs on a personal computer that has a TV tuner card in it. To make things better, he agrees with Richard Stallman and released it under the GPL, which means that everyone and his dog can get it for free, use it, hack it, redistribute it, etc. So that is what I am using. Yeah!

We came very close to choosing TiVo as our DVR. I had plans to buy a basic 80 hour box and add a larger hard drive if we needed it. I also planned on buying the lifetime subscription if we liked the service. I hate monthly fees. They are the bane of my existence. “For less than a dollar a day you can have…” a thirty dollar bill at the end of each month. EVERY MONTH. But I digress. The lifetime subscription was the equivalent of 2 years of service. I figured if we liked TiVo and stuck with it for 2 years, it would be worth our while. But they (the big wigs at TiVo) came up with this grand plan to make more money and wring every last dime out of their users. The spin they put on it was something like “No up-front fees” and something about only slightly higher monthly fees in small print. The idea is that users no longer have to buy a TiVo box — they lease one as part of the 1, 2, or 3 year contract for service. When the contract is over, you can upgrade your box when you renew it. Sounds like a great plan! If you want to pay $20 a month for the rest of your life.

Enter MythTV. (I think I already said that). I figured with TiVo, the startup costs would have been about $400 including the lifetime subscription. So I set out to find parts to fix up one of my old computers to make it a worthy Myth backend (server). I looked at all the shiny boxes that you can put in your entertainment center; the ones that don’t even look like computers and are so silent they make your fridge seem noisy. They cost about 3 times what I was willing to pay. After talking some with Darren, I decided the best way to go was to have a backend with the tuner cards and a big disk drive and a itty-bitty, thin-client frontend that hooks up to the TV. So we bought a Hauppage PVR 500 dual tuner card and a Hauppage MediaMVP for the frontend. Speaking of opensource software, a group of people hacked the MediaMVP software so it can run a program that speaks the MythTV protocol (basically it is a MythTV frontend). The project is MVP Media Center (MVPMC). It is a Linux kernel running a small program. Very cool.

So now we can tell MythTV what we want to watch and decide for ourselves when we want to watch it. Now if only I could keep it running all the time (it seems to segfault now and then…) then all would be well in the Domestic Tranquility Department. 🙂