Cherry Fluffy

I searched for “cherry fluffy” on Google and none of it was the genuine article. This is one of my favorite childhood desserts, along with several others that I just can’t get enough of (oatmeal cake, apple pudding, cherry cheesecake, etc.) I have to post this to share and to make sure that it is there for future generations. Not that future generations are likely to turn to my blog for recipe suggestions.

Cherry Fluffy

  • Crust
    • 1 1/2 C. flour
    • 1/3 C. brown sugar, lightly packed
    • 1/2 C. + 1 T. butter, room temperature
    • 1/2 C. chopped walnuts
  • Filling
    • 1 C. milk
    • 37 large marshmallows
    • 1 pt. heavy cream
    • 1 can cherry pie filling
  1. Mix the crust ingredients together with hands
  2. Spread in a 9×13 baking dish and bake for 15 minutes at 400°F
  3. After baking, crumble with a fork while it is still warm
  4. Save 3/4 C. for topping and press the rest back into the bottom of the 9×13 pan; packed, but not too firm
  5. Heat the milk and marshmallows until melted
  6. Set aside to cool, stirring occasionally
  7. Whip cream and fold into marshmallow mixture
  8. Spread half the mixture over the crust in the pan
  9. Add the cherry pie filling in a thin layer
  10. Top with the remaining marshmallow cream mixture and finish with the reserved crumbled crust
  11. Refrigerate overnight before serving
  12. As a child, I remember this stuff going fast. But not everyone in my family *now* likes cherries. So sometimes we make half cherry fluffy and half chocolate fluffy, substituting chocolate pudding for cherry pie filling, and then adding grated chocolate as a garnish. That is pretty tasty too, but I still love the original.

Playing with GPS

I must have spent too much time hearing the other Elecraft K3 owners talk about fancy precision oscillator stuff because when the idea got into my head that I could make a really ‘simple’ embedded NTP server with the bonus side-effect of a GPS disciplined oscillator, I could not get the idea out of my head. So that is my latest project. I started by reading loads of hardware spec sheets and looking at various required components. Then after I had a pretty good draft of what the plan was, I started ordering engineering samples. The hope was to do this with purchasing as little as possible in the way of parts. So far, I have acquired a good portion of the parts and hope to get a few more before I have to go get the rest on my own.

One of the things I DID purchase was a GPS device. I didn’t want any old GPS receiver, I wanted one that had a 10kHz output that is in sync with the 1 PPS output. Really this meant that I had to go with an older (used) model. But because they are a bit rare these days, that didn’t really save me much in the way of money. I was giddy when it came in the mail. I started poking at it. Documentation was scarce. Finally I figured out that it has an Oncore GPS core in it, which finally led me to some more detailed documentation about the serial interface. After that, it was just a matter of whipping up some software to read and write the necessary packets. Then the fun started. I started logging data and learned how to make use of some of it. I have a handful of commands that I use to set it up and receive location updates, satellite position, and leap second information.

After looking at the location information that the receiver was providing, I moved on to the GPS location. Then I decided to make a tool to visualize the satellite positions. First I did this using ASCII art in the shell (which turned out surprisingly well). Then I added the traces of the satellite positions over the last 24 hours. This showed me some interesting things. First of all, it showed me that I had my plot wrong. (I had the north pole over in the east…. Ooops). Second, it was more a general coverage plot, since characters aren’t quite so precise as pixels. This convinced me to move on to a pixel-based plot, using pygtk. This one started out simple, but got fancier as I realized that it would be easy to add a feature here and a feature there. The gtk version lets you mouse over a satellite and it shows more detail about that satellite, like the ID number, lock status, azimuth and elevation, etc. It also shows the trails of the satellites in dots that are color matched to the squares that represent the satellites. If the satellite is locked, then there is also a circle around it. The plot updates in real time with the changes in the log file from the GPS device.

Lego CW Iambic Paddle

As I read the April 2011 edition of QST, they featured a picture of a CW key made of Legos on page 20. I thought to myself that this was the kind of project I was up to. Rather than a straight key like N1LF made, I decided to go with an iambic paddle. You might be asking yourself, why would Vernon make a lego paddle when he has a cool CW touch keyer that he finished 2 months ago? Two reasons: 1) because I am a tinkerer, and 2) the touch keyer is way to sensitive and lacks the tactile feedback (I think) I want. The capacitive touch sensors I used don’t seem to be very adjustible, which is unfortunate, because when I finally assembled it in the box, the key sensitivity went way up. It can sense my finger about 1/16th inch away, which means it is transmitting dits and dahs before my brain gets the tactile feedback from touching the cold aluminum. Let’s see what Legos can do for me.

When I was a kid, I got some Legos Technics and loved them. I spent hours building things. I even went as far as rigging up a motor to work with them (since my set didn’t have one). I kept them all those years and pulled them out this morning an whipped up a iambic paddle before work. Nathan was impressed with my skills and was happy to find that I used MY Legos and not HIS Legos. The design is all original and was mostly constrained by the variety of pieces that I had on hand. But it seems to be well built and not too wobbly. In other words, you can use it just fine, but you can’t really slap it around. The only non-Lego parts are the bolt and washers for paddle adjustment, the rubber band for paddle return, and the aluminum foil for the contacts. I found an old stereo 1/8 inch plug and cord in my junk drawer and wired it all up at lunch time. It works like a champ. Maybe not so smooth as a Begali Magnetic Pro paddle that I am dreaming of, but maybe it will get me there until I can save my Euros to buy one.

DDRR for the car

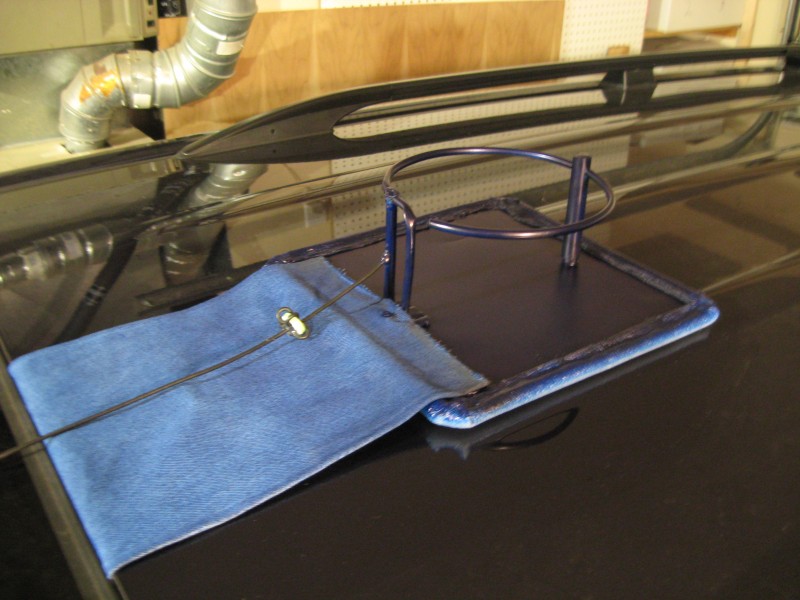
I got bitten by a little APRS bug this week, right after I finished assembling my K3 while waiting for the power supply and coax to arrive. I wanted an antenna we could mount on the top of Lauren’s minivan for any roadtrips we might take. But because it is not MY car, there are quite a few more restrictions. Like: no holes in the car; no physical changes to the car; not ugly (beauty is in the eye of the beholder?); why do we need an antenna again? I also placed the restrictions on it that it must be cheap (or free), easy to build, and work at least as well as my SMA-24, which is my most-commonly used HT antenna.

I started off with a Google search of homebrew 2m antennas to find that pretty much people make j-poles or 1/4-wave vertical antennas; neither of which look good on top of a minivan. I searched more, for low-profile antennas. I suppose I could have come up with a coil-loaded whip of sorts, but I wanted something cooler. I finally found a great write-up on how to build a 2m DDRR antenna. I had never heard of a DDRR antenna before, but being fairly new to the hobby, there are a lot of things I have never heard of. DDRR means Directional Discontinuity Ring Radiator or Direct Driven Ring Radiator, depending on where you look, was originally invented by J.M. Boyer for use on ships. It consists of a 1/4-wavelength element, grounded at one end and wound into a single coil, a short distance above ground. Because I found W5GVE’s article before the W6WYQ’s 1971 QST “A 40-Meter DDRR Antenna” article, I followed the W5GVE instructions, which differ slightly. The biggest difference being the height of the antenna and the feed point. I may have to try again following W6WYQ’s plans.

I started with a piece of 1/4″ copper flex tubing and bent it around a #10 tin-can, which is just about 6 inches in diameter. I made a 3 inch tail with a short flange for the ground contact. For the ground plane, I found a piece of ducting sheet metal lying around. With a small piece of angle-iron and some #4 metal screws, nuts and washers, I made a secure mount for the radiator, which was now starting to look like a heavenly halo (so say the kids). Using a small strip of tin soldered to the feed wire and crimped around the tubing, I was able to adjust the feed point for optimal radiation. Once in place, I slipped the feed wires into an old empty pen for mechanical reinforcement. I marked the spot an soldered the feed point in place. I used another screw and nut to connect the shield of the coax in place below the feed point, mounting the pen over the nut. For more stability, I used an old Crayola marker tube on the side of the ring opposite the ground. I added padding to the bottom and sides so it wouldn’t scratch its precious bearer, painted it for camouflage, and viola! it was finished. Oh, I almost forgot to point out that I also added means to mount the antenna: a strip of fabric connected to the front and a rope across the back to keep it down. I think it will serve usme well.

For testing throughout the development process, I used my HT at 0.5W and 5W to transmit APRS packets and to use voice. APRS is nice because if it hits a digipeater I get my packet transmitted back to me. Voice is nice because I can get a bona-fide signal report. I am not sure about the actual electrical specifications of this antenna because I do not have an antenna analyzer, a SWR meter, dip meter or anything of that sort, but it works and I think that is a good indication of how well it works.

I suppose the real test is if Lauren will let me use it on her minivan. See my antennas album for more pictures.

Foray into HF

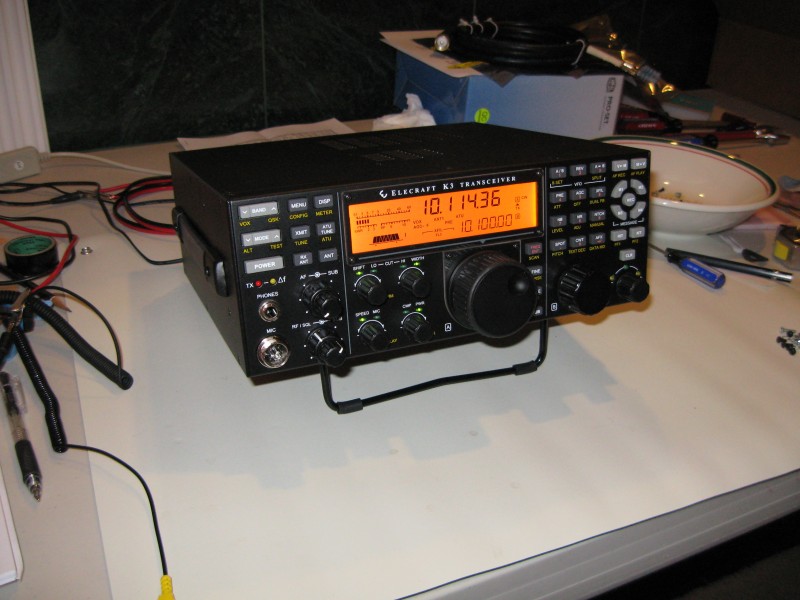
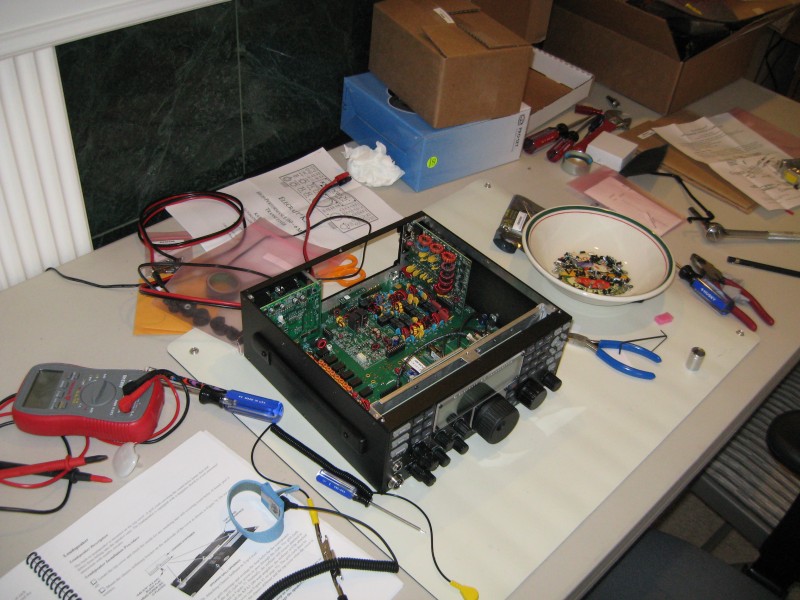
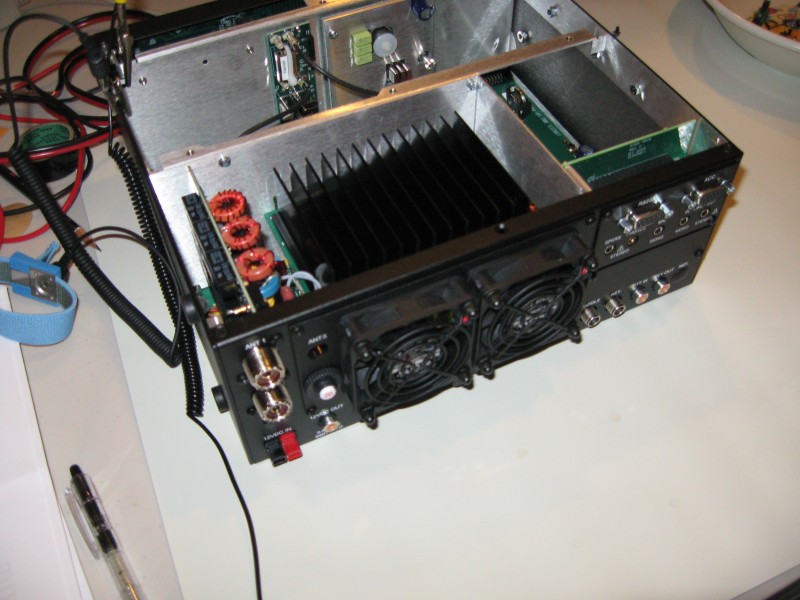
I have been saving my pennies (er, dollars) for almost 18 months so I could buy myself a shiny new HF base station radio without breaking the bank. I ordered stuff this last Monday in hopes that it would get here in time for my birthday. I was pleasantly surprised at how fast Elecraft processed my order. It arrived Thursday evening. I started assembly last night, worked some more this morning and afternoon and now have a fully assembled K3/100 sitting on my work table.

I was very impressed with the assembly instructions provided. They were very clear, step-by-step instructions with plenty of diagrams and pictures to make sure that nothing went amiss. I am very happy with my purchase. Now I just have to wait until Monday and Tuesday for the remaining shipments of gear and supplies to get my HF radio on the air. I am still missing my 30A power supply, coax, and antenna.

Here are some pictures of the assembly process….

A USB CW Keyboard

After getting my amateur radio license without having to pass a CW test, I felt a little bit cheated, so I vowed that I would learn CW and do my best to help keep it alive. After all, that is one of the two things that I remember about ham radio from my childhood (beeping and antennas). In the past year and a half, I am sorry to say that I have not yet mastered CW. But I have learned a lot about learning CW. 🙂 Baby steps, right?

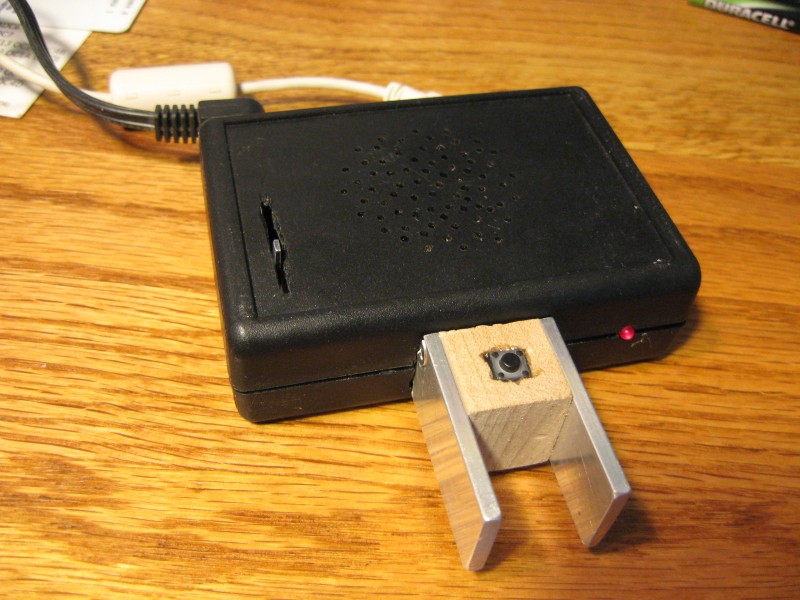
Because one reason I decided to get into amateur radio was to give myself an outlet for my tinkering needs, I felt it was only fair that I should devote some of this tinker time to learning CW. How do you do that? By making a touch-sensitive paddle with an iambic keyer. This is what I set out to do about six months ago and am proud to say that I have a working finished product to share today. Much of my inspiration was from the fine folks at CW Touch Keyer. Their products were very alluring and I almost bought one of them instead of building it myself, but they didn’t meet all my requirements. (Their Master Keyer was not available yet, which I think does meet all my requirements except the actual paddle part, which you must supply yourself.)

My design goals:

  • Touch sensitive paddles
  • Act as an USB HID keyboard
  • Small
  • Variable, persistent settings
    • WPM 5-100
    • Variable sidetone frequency 100-1000 Hz
    • Various keyer modes (iambic a/b, ultimatic, bug, etc.)
    • Memories (with auto repeat)

I am happy to report that I have met these goals and more with the N7OH CW-KBD. For the low, low price of $150 you can buy the parts to build your own. I think if I had plans to make this a commercial venture, I would have to cut down on my costs. First to go would likely be the Teensy because if I swapped that out for a Microchip PIC, I could also get rid of the two capacitive touch sensors. Putting that all on a single chip with a small single board, I could certainly reduce the price some. But that is a story for another day.

I started acquiring parts for the keyboard back in the April/May time frame. I started with the basics: I needed the Teensy so I could start tinkering and get back into the AVR embedded programming mode; I needed the capacitive touch sensors so I could get a board designed and start working with them (they only came in tiny surface mount packages so I had to create a breakout board for them); I also ordered some of the other stuff I would eventually need to save on shipping later. Then I excitedly jumped into Eagle and created my breakout board. I actually created a couple of designs. Since ordering with BatchPCB has a base cost plus a per-square-inch cost, I decided that ordering a couple of different designs would not be an issue. And it turns out they sent my twice as many as I ordered (probably because the designs were so small and they had extra room that wouldn’t fit anything else.) That was a really fun process though; I have never designed a PCB before.

I don’t know how many hours I spent reading through the 408-page ATMega32U4 manual. I pulled out some old AVR code I had written in college and tried to make it work. I spent about as much time refactoring the old code as I would have spent writing new stuff. Finally I had some basic hardware support for timers, PWMs, and USB (with the help of LUFA.) From there, I moved back to the non-embedded space to try out the main portion of CW encoding and decoding. First I whipped up a program that would write out the proper timing for dits and dahs if given a string of text to type. It didn’t take very long for that, but it was much faster to have printf and instant feedback without reprogramming a device. I ported this code back to the Teensy (with minimal changes, thanks to my portable coding techniques) and was able to get a simple program up and running that would blink “hello world.” at me once a minute. I moved back to userspace and figured out how to use raw events to emulate interrupts and user timers instead of hardware timers. I extended my program to with a state machine that would read in dit and dah paddle presses and encode them into a stream of CW that can be decoded into ASCII and pushed up to the HID layer. My original state machine was too complex and introduced timing errors into the encoding, so I ditched it for this simpler version.

It took me a while to hunt down all the itty-bitty timing issues. Sometimes there were weird little hiccups in the output that I couldn’t explain. I did finally hunt them down and get smooth operation though. Then I went and filled out the big wish list of coding features (memories, keying modes and speeds, etc.) This took some time but was quite fun. I also found and fixed a few more bugs that I uncovered while I was at it. After I had the list all checked off, I still didn’t have the nerve to permanently affix all the parts. Up until now, they were all connected on a solder-less breadboard. I decided to get crazy and reduce the power consumption. It’s not like it was a pig or anything; it was already using a low-power sleep mode and was completely interrupt driven. I knew that I could reduce the 40mA power requirement with a bit of skillful coding. While it did not have any busy loops, there were a lot of wake-ups that were not needed. For example, part of the architecture is a 1ms timer that allows things to run with a 1ms accuracy. But what if nothing needs to run? It would still fire. I managed to have the things that didn’t need to run inform the timer and then have the timer shut down if there were no users. This meant than if the paddles were not pressed, it would go into a deep sleep state (<10mA) and then would wake up as soon as a paddle was pressed.

Finally, I got brave and soldered all my parts together on a prototyping board and put it in a little plastic case. I drilled holes in all the right places to allow for the connectors (power, USB mini-B, key out, paddle out, an LED, a reset button, the speaker, the volume control, and the paddles). I skillfully mounted the two aluminum paddles on a small block of wood and then cut a groove in them to make them have a solid mechanical connection to the box. I am pretty proud of the box. After I had it all assembled, I realized it was too light weight and would move around whenever I touched the paddles. I fixed this by adding some screws to the bottom so I could screw it to a plate of lexan.

The architecture of the project goes something like this:
paddles intput dits and dahs that get synchronized by the timer. Depending on the keying mode, a continuously pressed paddle may or may not continuously send dits or dahs. Also depending on the keying mode, different things may happen if both paddles get pressed at the same time. The input state machine handles all of this, resulting in a queue of dits, dahs and spaces that are ready to be consumed. The output state machine looks at the queue and sends the bits to the output pins (the buzzer and the paddle/keyer pins) as well as trying to decode the stream of dits, dahs and spaces into characters. Every recognized character gets enqueued into the HID queue, which gets sent off to the computer if it is plugged in. In addition to the two paddles, there is also a single button that can enter and exit "Command Mode." Command mode allows the user to change various parameters such as buzzer frequency, keying speed, keyer mode, paddle orientation, etc. All of these settings are saved in EEPROM, so they are persistent across power losses.

Kenwood TH-D72 and Linux

I recently found a buyer for my Icom IC-92AD, which enabled me to buy one of the new Kenwood TH-D72 radios. This is my first GPS-enabled device and a new radio to boot. I am thrilled. I got it in the mail in just enough time to scan through the instruction manual to figure out how to use it for the Monday night Beaverton CERT Net. I got on the air without any problem. The manual is not nearly as nice as the Icom manual was. First of all, they don’t give you the complete manual printed, only a getting started guide. The manual is on a CD in PDF format.

The TH-D72 has a mini-B USB connector and comes with a cable. Curious, I plugged it in to my computer and saw that it loaded the cp210x driver and gave me a /dev/ttyUSB0 device. Hooray!!! It didn’t work. 🙁 It turns out that the Natty kernel I am running has a regression in it (a story for another day). I tried out the Maverick kernel and it works just fine. So running the Maverick kernel, I was able to open up minicom, set the baud rate to 9600, and establish communication with the radio. It is NOT self discoverable. Grrr. I type in something and it gives me back ‘?’. It appears that there are two modes. With the packet12 TNC enabled, it will echo your keystrokes and give you a ‘cmd:’ prompt. If you type something wrong, it will say ‘?EH’. Without the TNC enabled, it does not echo keystrokes and will give you a ‘?’ if it did not understand the command you sent it.

Not seeing an obvious way to figure out the command set, I figured that we should try to reverse engineer it. I installed the MCP-4A program in wine. I tried to run it and it complained that it needed .NET 2.0. I tried installing dotnet20 and found that is not quite enough — it wants dotnet20sp1 or greater. dotnet20sp2 does not install. dotnet30 does not install. When I run MCP-4A with dotnet20, it throws a few errors and does not give me full use of the program (no menubar, for example), but it does run. I was able to use Wireshark to sniff the USB traffic as I performed a read and write. Then I turned to python to whip up something that can do this natively. This is what I have so far:


#!/usr/bin/python
# coding=utf-8
# ex: set tabstop=4 expandtab shiftwidth=4 softtabstop=4:
#
# © Copyright Vernon Mauery, 2010. All Rights Reserved
#
# This is free software: you can redistribute it and/or modify it
# under the terms of the GNU Lesser General Public License as published
# by the Free Software Foundation, either version 3 of the License, or (at
# your option) any later version.
#
# This sofware is distributed in the hope that it will be useful, but WITHOUT
# ANY WARRANTY; without even the implied warranty of MERCHANTABILITY or
# FITNESS FOR A PARTICULAR PURPOSE. See the GNU Lesser General Public
# License for more details.
#
# You should have received a copy of the GNU Lesser General Public License
# along with this software. If not, see .

def command(s, command, *args):
cmd = command
if args:
cmd += " " + " ".join(args)
print "PC->D72: %s" % cmd
s.write(cmd + "r")

result = ""
while not result.endswith("r"):
result += s.read(8)

print "D72->PC: %s" % result.strip()

return result.strip()

def l2b(*l):
r = ''
for v in l:
if type(v) is str:
r += v
else:
r += chr(v)
return r

def bin2hex(v):
r = ''
for i in range(len(v)):
r += '%02x '%ord(v[i])
return r

def bin_cmd(s, rlen, *b):
if b is not None:
cmd = l2b(*b)
else:
cmd = ''
print "PC->D72: %s" % cmd
s.write(cmd)
result = bin2hex(s.read(rlen)).strip()
print "D72->PC: %s" % result
return result

def usage(argv):
print "Usage: %s " % argv[0]
sys.exit(1)

if __name__ == "__main__":
import serial
import sys

if len(sys.argv) < 3:
usage(sys.argv)

s = serial.Serial(port=sys.argv[1], baudrate=9600, xonxoff=True, timeout=0.25)

#print get_id(s)
#print get_memory(s, int(sys.argv[2]))
print command(s, 'TC 1')
print command(s, 'ID')
print command(s, 'TY')
print command(s, 'FV 0')
print command(s, 'FV 1')
print bin_cmd(s, 4, '0M PROGRAMr')
s.setBaudrate(57600)
s.getCTS()
s.setRTS()
of = file(sys.argv[2], 'wb')
for i in range(256):
sys.stdout.write('rfetching block %d...' % i)
sys.stdout.flush()
s.write(l2b(0x52, 0, i, 0, 0))
s.read(5) # command response first
of.write(s.read(256))
s.write('x06')
s.read()
print
of.close()
print bin2hex(s.read(5))
print bin2hex(s.read(1))
print bin_cmd(s, 2, 'E')
s.getCTS()
s.setRTS()
s.getCTS()
s.getCTS()
s.close()

You run it like this:

$ python thd72.py /dev/ttyUSB0 d72-dump.dat

Unfortunately from what I have seen, two consecutive reads without any changes on the radio seem to have very big differences. It is as though some of the chunks of the file are rotated or shifted by a few bytes (and the shift is not constant throughout). Not seeing an immediate reason for this, I suspect that it is some form of obfuscation. Call me a pessimist.

I will continue to work on this, but I would love to see what others in community are doing as well.

Update:

I forgot to mention that the whole point of this exercise was to find a way to work it into CHIRP. I am currently working on a driver for this radio to enable it in CHIRP. And as I was looking over the tmv71 code in CHIRP, I noticed that I should be reading a response to the read block command _before_ I actually read the block data. This seems to help things out a bit (and I modified the above code to match).

Roasted Cranberry Sauce

One of Oregon’s food exports is the cranberry, accounting for about 5% of the nationwide harvest. This year, we bought some local cranberries to make into cranberry sauce. My first time ever. Historically, it was Dad’s job (which he relished a lot) to make the cranberry sauce. His was usually ground up with oranges, sugar and nuts. I always tried some, but never LOVED it. But when I saw Nick post a Roasted Cranberry Sauce recipe, I had to try it. Since I don’t have any Triple Sec around, I modified it a bit, but it turned out great. I made it last night so it could mellow in the fridge overnight before the big day. And I daresay, this is the best cranberry sauce I have ever had. Sorry, Dad.

Roasted Cranberry Sauce with Candied Pecans (Adapted from Macheesmo, where it was pretty heavily adapted from a Bon Appétit recipe)
Makes about 3 Cups, easy to double or triple though.

Cranberries:

  • 1 pound fresh cranberries
  • 1 Cup sugar
  • 3 Tablespoons neutral oil
  • 1 Tablespoon fresh rosemary, minced
  • 1 Teaspoon fresh thyme, minced (or 1/4 t. dried)
  • 1 Teaspoon fresh sage, minced (or 1/8 t. sage powder)

Sauce:

  • 1/8 Teaspoon cinnamon
  • 1/3 Cup orange juice
  • 1/4 Cup sugar
  • 1/2 Cup currants (you could sub raisins, but chop them roughly so they aren’t so big)
  • Pinch of salt

Pecans:

  • 1 Cup pecans, roughly chopped
  • 2 Tablespoons water
  • 1/4 Cup sugar

Instructions:

  1. Mix cranberries, oil, 1 C. sugar, and herbs together in a bowl. Roast at 425°F for 20 minutes, stirring after 10 minutes.
  2. While cranberries are roasting, mix sauce ingredients in a medium sauce pan and simmer for 10 minutes.
  3. Remove cranberries from oven and add to the sauce pan. Simmer for another 2-3 minutes.
  4. While simmering the sauce, mix the pecan ingredients and spread on a baking sheet and roast for 8-10 minutes at 425°F.
  5. Remove nuts from the oven and stir as they cool. Place cooled pecans in an airtight container.
  6. Chill sauce overnight in fridge. Serve heated or chilled, topped with pecans.

Tame your bash history

I am a packrat, but I do like a bit of order. This makes maintaining my bash history difficult. There are some commands that I use frequently that seem to fill up my history file making it hard to keep some of the lesser used, yet very important commands in the history. Finally sick of the problem, I poured over the manpage for bash and found the section on HISTCONTROL. From the description there, I found that this along with HISTIGNORE, I can almost eliminate my problem of my bash history getting too full of stupid common commands.

I added this to my ~/.bash_profile:


export HISTIGNORE="&:ls:[bf]g:disown:cd:cd[ ]-:exit:^[ t]*"
export HISTCONTROL=ignoredups:ignorespace:erasedups
export HISTFILESIZE=2000

Here is the snippet from the bash manual that corresponds to these controls:

       HISTCONTROL
A colon-separated list of values controlling how commands are saved on the history
list. If the list of values includes ignorespace, lines which begin with a space
character are not saved in the history list. A value of ignoredups causes lines
matching the previous history entry to not be saved. A value of ignoreboth is
shorthand for ignorespace and ignoredups. A value of erasedups causes all previous
lines matching the current line to be removed from the history list before that
line is saved. Any value not in the above list is ignored. If HISTCONTROL is
unset, or does not include a valid value, all lines read by the shell parser are
saved on the history list, subject to the value of HISTIGNORE. The second and sub-
sequent lines of a multi-line compound command are not tested, and are added to the
history regardless of the value of HISTCONTROL.
HISTFILESIZE
The maximum number of lines contained in the history file. When this variable is
assigned a value, the history file is truncated, if necessary, by removing the old-
est entries, to contain no more than that number of lines. The default value is
500. The history file is also truncated to this size after writing it when an
interactive shell exits.
HISTIGNORE
A colon-separated list of patterns used to decide which command lines should be
saved on the history list. Each pattern is anchored at the beginning of the line
and must match the complete line (no implicit `*' is appended). Each pattern is
tested against the line after the checks specified by HISTCONTROL are applied. In
addition to the normal shell pattern matching characters, `&' matches the previous
history line. `&' may be escaped using a backslash; the backslash is removed
before attempting a match. The second and subsequent lines of a multi-line com-
pound command are not tested, and are added to the history regardless of the value
of HISTIGNORE.

The Perfect Spammer

Going through the daily blogroll this morning, I came upon a comic that could not be more true. A while back I posted on Combating Spambots. Since I implemented that anti-spam scheme, I have not seen a single piece of spam come through. It is beautiful. XKCD has posted an alternative method, which really would work if you had an active community around your website. The perfect spammer could get through, but I think I would be okay with that.